CalendarMaker makes calendars for Grid – to print, and to use every day on the communication device. It is free, works in the browser and needs no account. Everything you enter stays in your browser.
From one set of choices, CalendarMaker creates up to three grid sets:
Calendar for the device – year, months, weeks and one page for every day. Today’s date and time come live from the device. Appointments are written into the day page and stay in the grid set. With a morning circle, questions about the day and “n more sleeps”.
Printable calendar – wall calendar, weekly planner, day sheets, timetable and meal plan. You print from Grid.
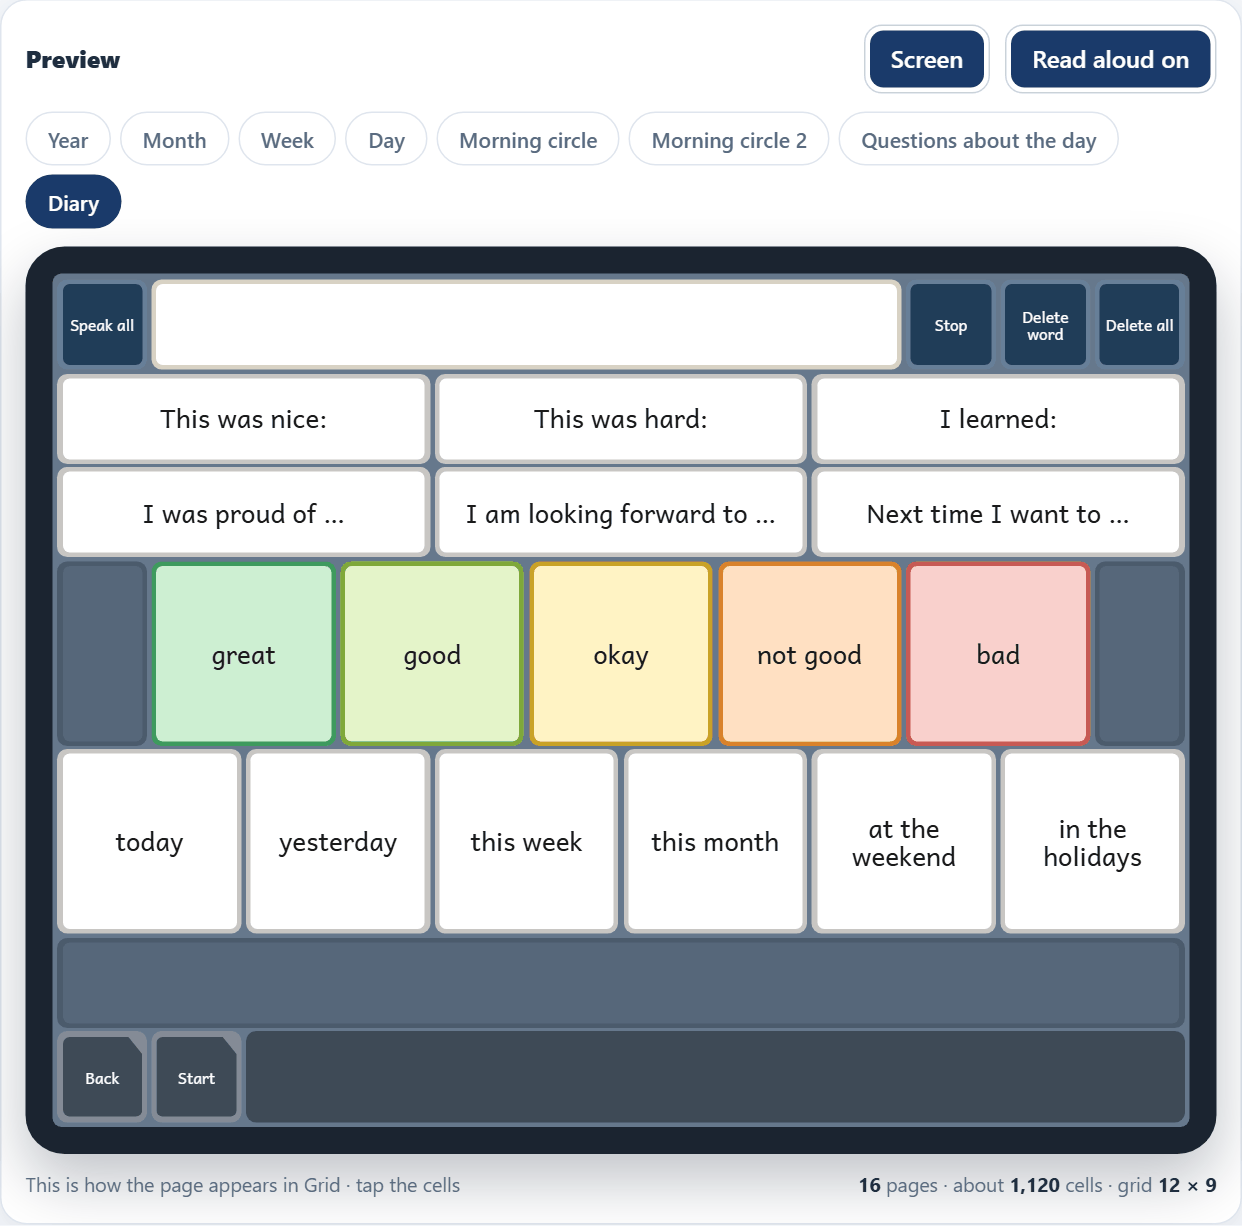
Diary – tap a day, write, “Add to diary”. With sentence starters, feelings and a page for looking back. Entries can be carried over into next year.
Every page uses the same 12 × 9 grid, like all AssistUK grid sets. Back, Start and My pages are always at the bottom left.
Your calendar in ten minutes
Open CalendarMaker. On the first page, choose a template that fits – school, work, living with support or family.
Choose the year, the country and the region. They decide the public holidays and school holidays.
Enter birthdays and the people who come regularly – with a photo if you like.
On the last step, press Create all … grid sets. The files are saved by your browser.
In Grid, add the files under Grid Explorer → Add grid set.
Press Save project. Next time you load the project file and carry on.
Everything on the right is a preview: tap the tiles – they read aloud and write, just like in Grid. METACOM, PCS and SymbolStix symbols only appear in Grid; the AssistUK symbols already show in the preview (see symbols).
Step 1: What for? Templates
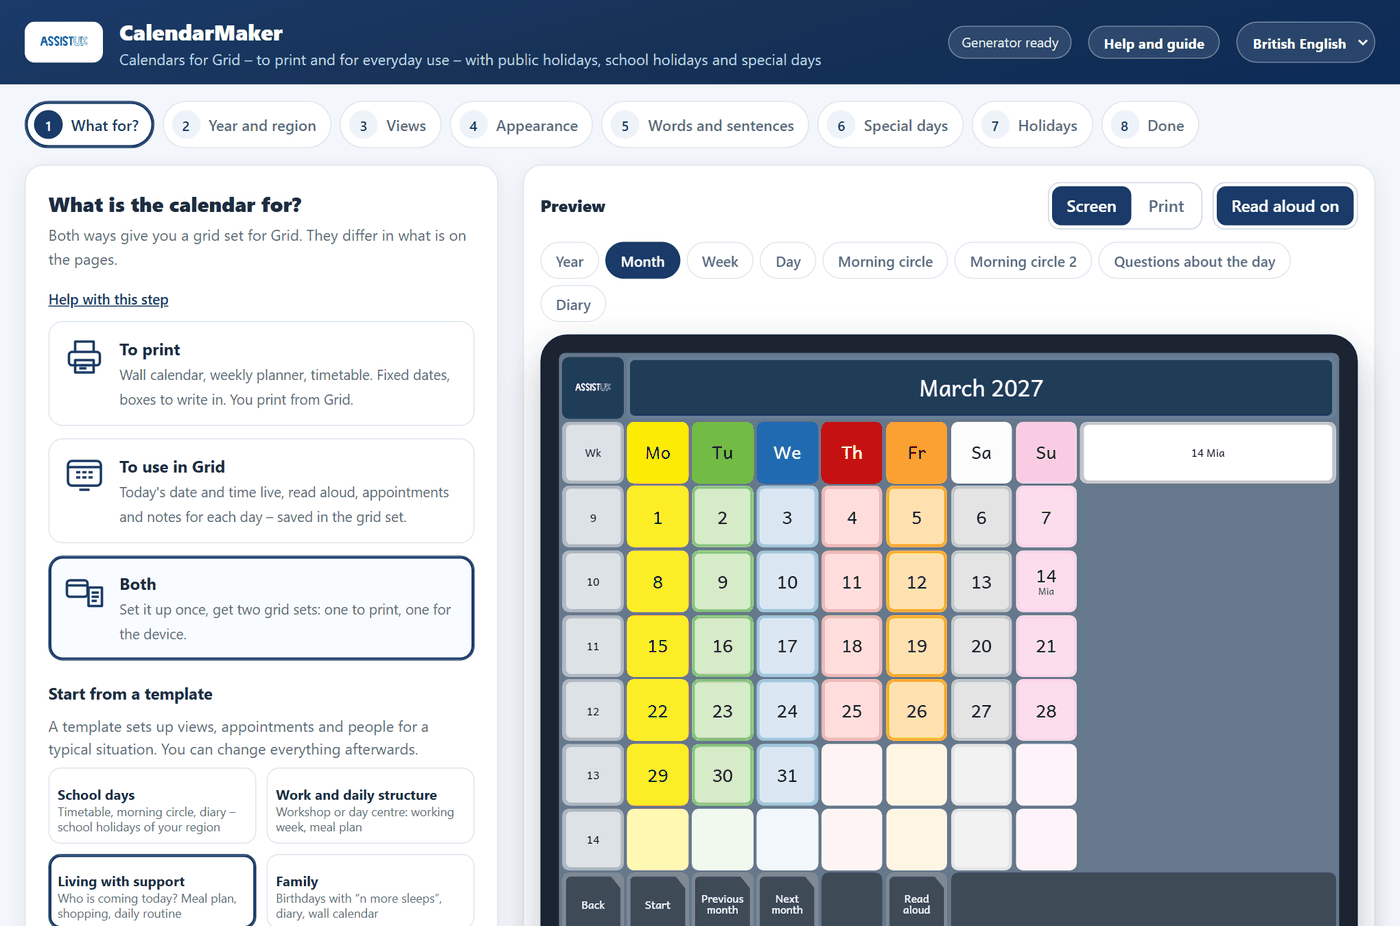
Choose whether the calendar is to print, to use in Grid or both. “Both” gives you two grid sets from the same settings.
Step 1: purpose, templates and the diary.
Templates are a quick start. They set views, weekly appointments and people for a typical situation:
School days
Timetable, morning circle, diary, holidays of your region.
Work and daily structure
For a workshop or a day centre: working week, meal plan, transport.
Living with support
“Who is coming today?”, meal plan, shopping, daily routine.
Family
Birthdays with “n more sleeps”, diary, wall calendar.
Entries marked “(example)” are there to be replaced. Everything can be changed afterwards. Below the templates you can add the diary as an extra grid set.
Step 2: Year and region
Country and region decide the public holidays; the language decides month and day names and all labels in the grid set. For many countries you can choose a region – then only the holidays that apply there are shown.
The language of the grid set can differ from the language of the app: for example, the app in English and the grid set in German.
The week can start on Monday, Sunday or Saturday. Week numbers (ISO) only exist when the week starts on Monday.
Step 3: Views
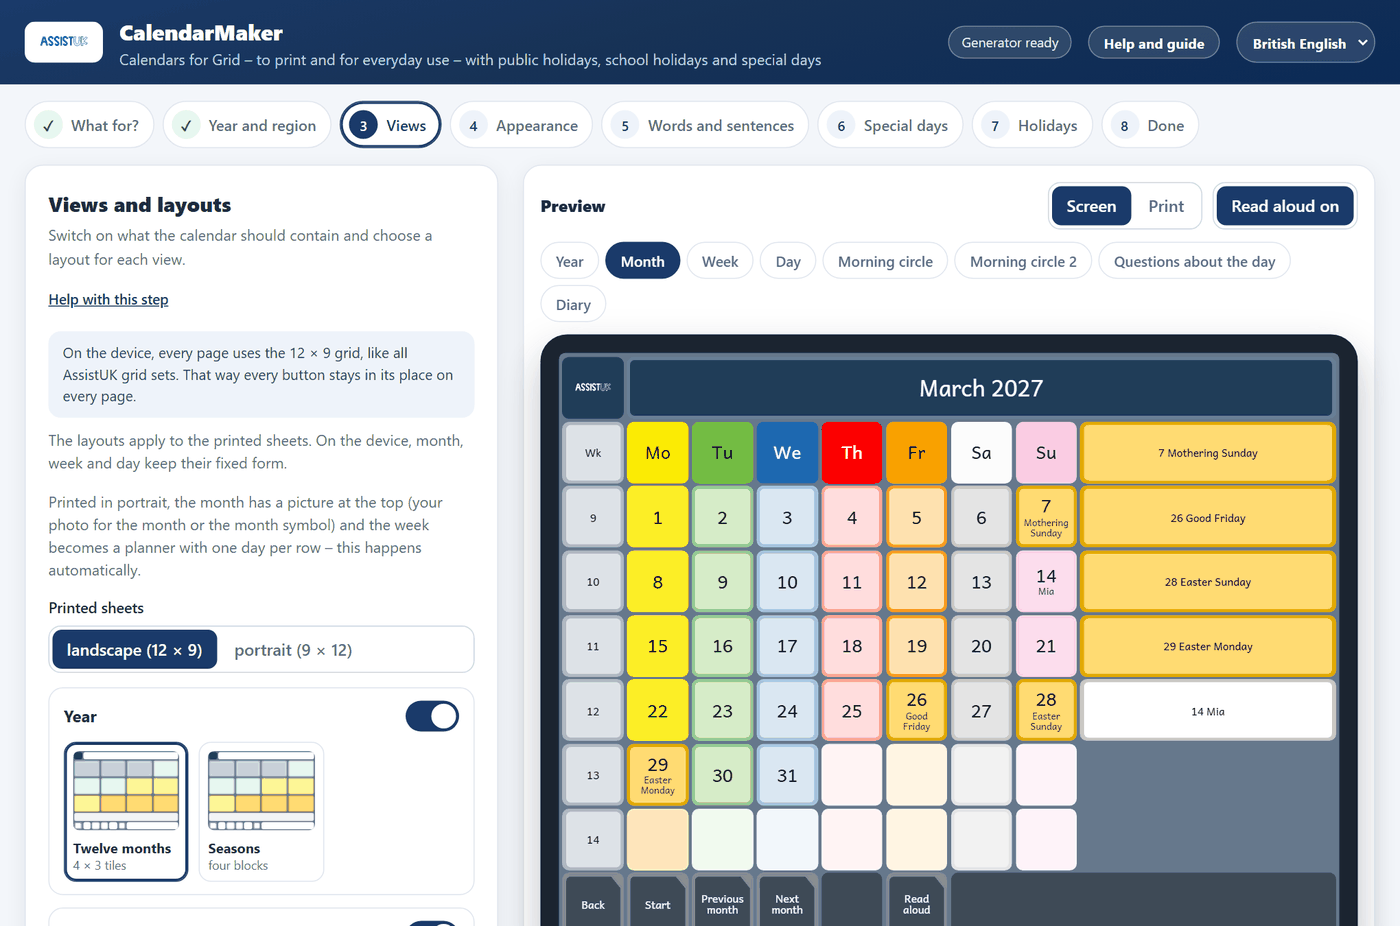
Switch on what the calendar should contain: year, month, week, day, morning circle. For the printed sheets you also choose the layout and landscape or portrait.
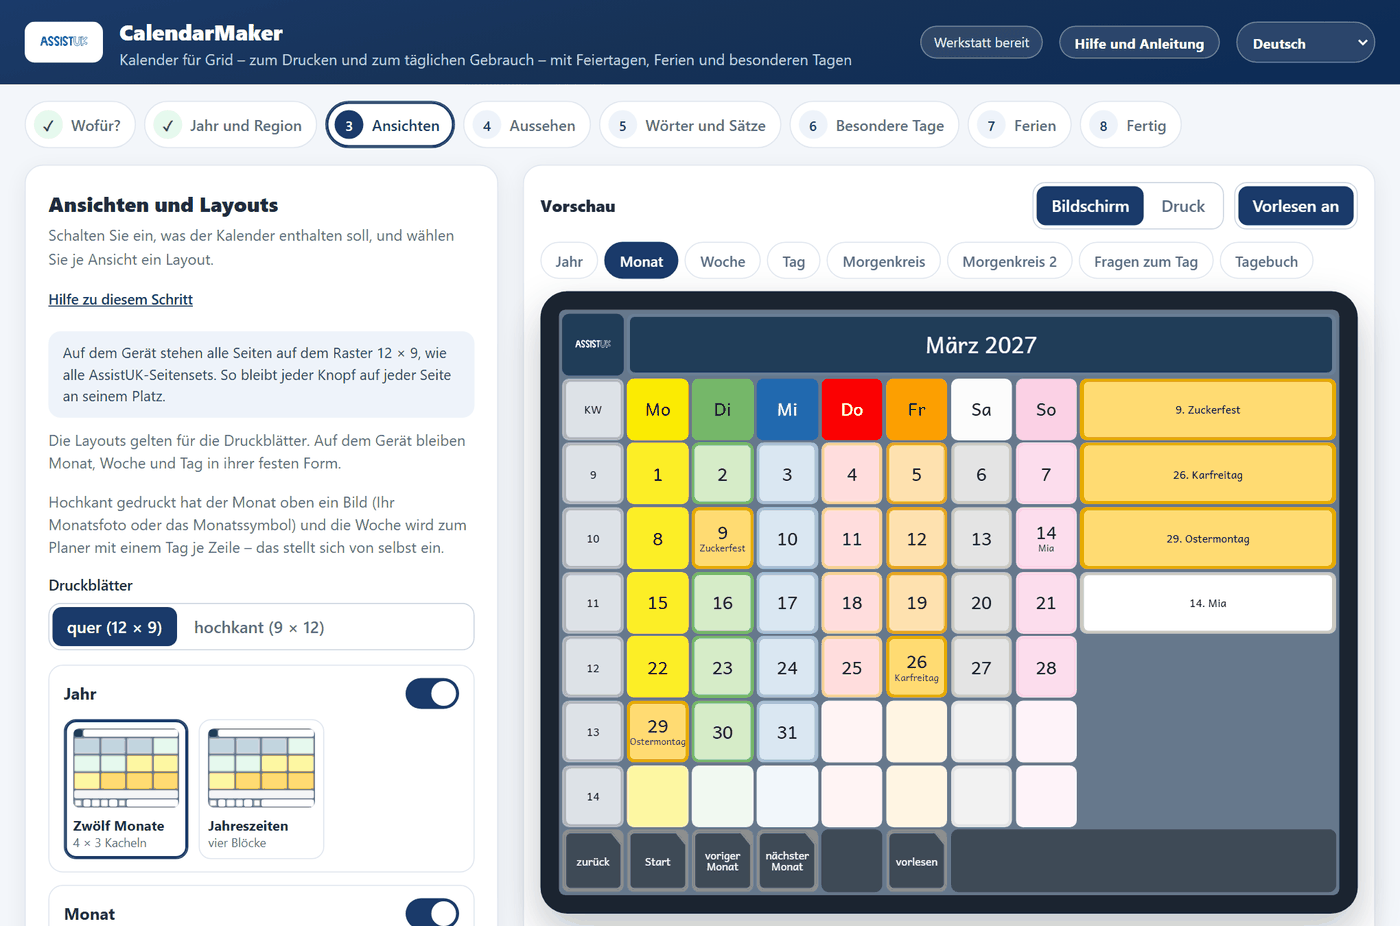
Step 3: views and layouts.
Timetable
One printed sheet for the whole school year: Monday to Friday, eight lessons.
Meal plan
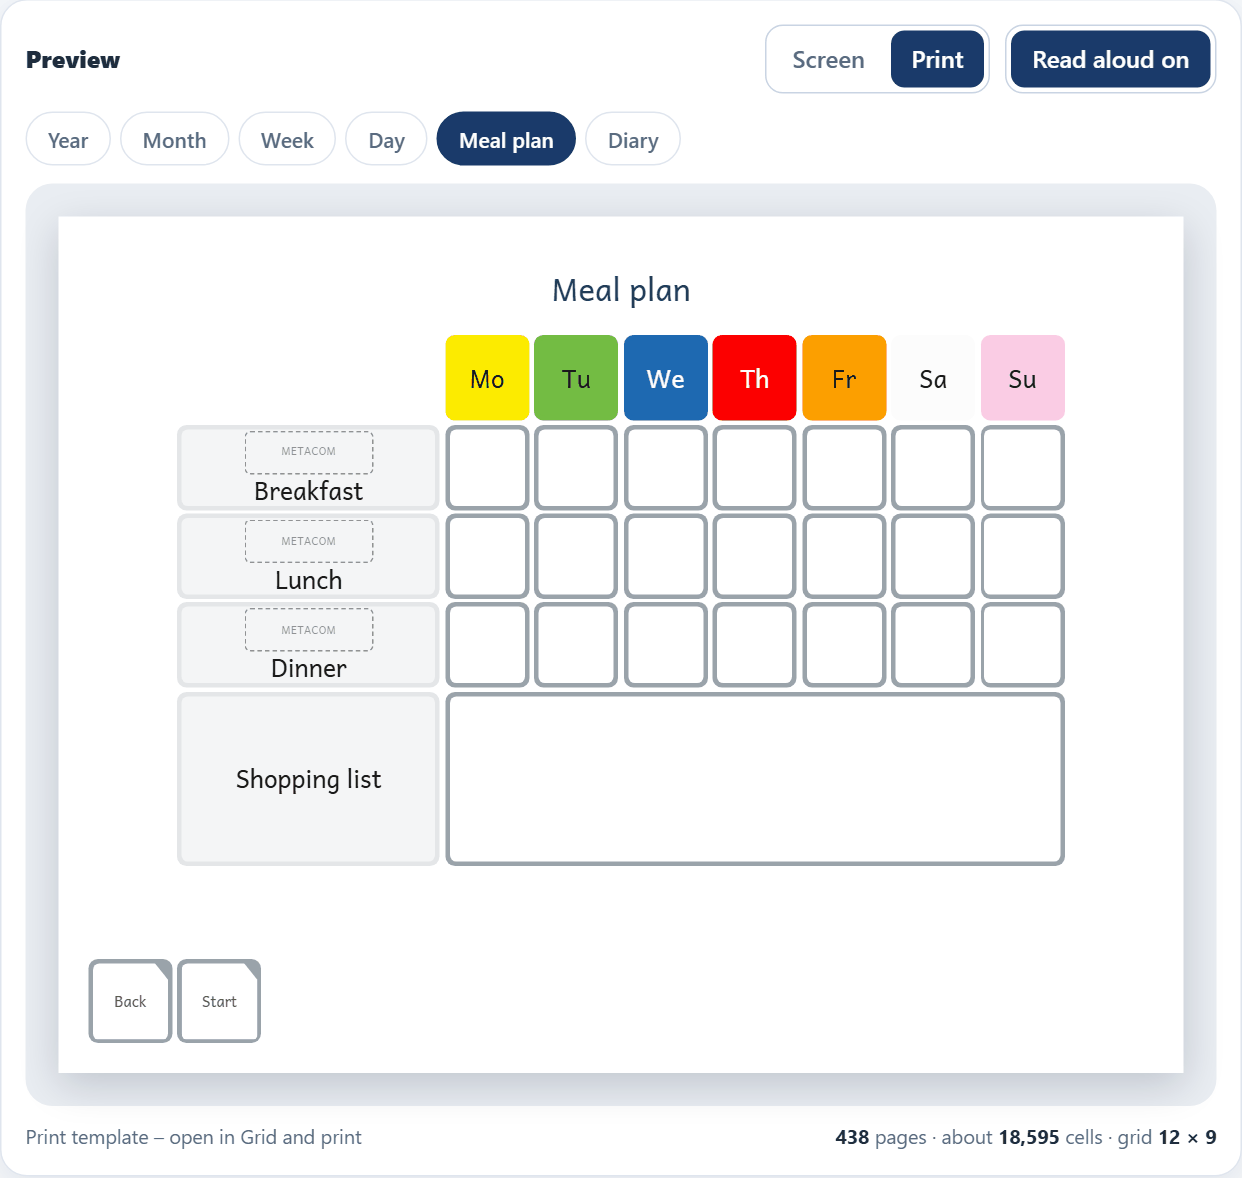
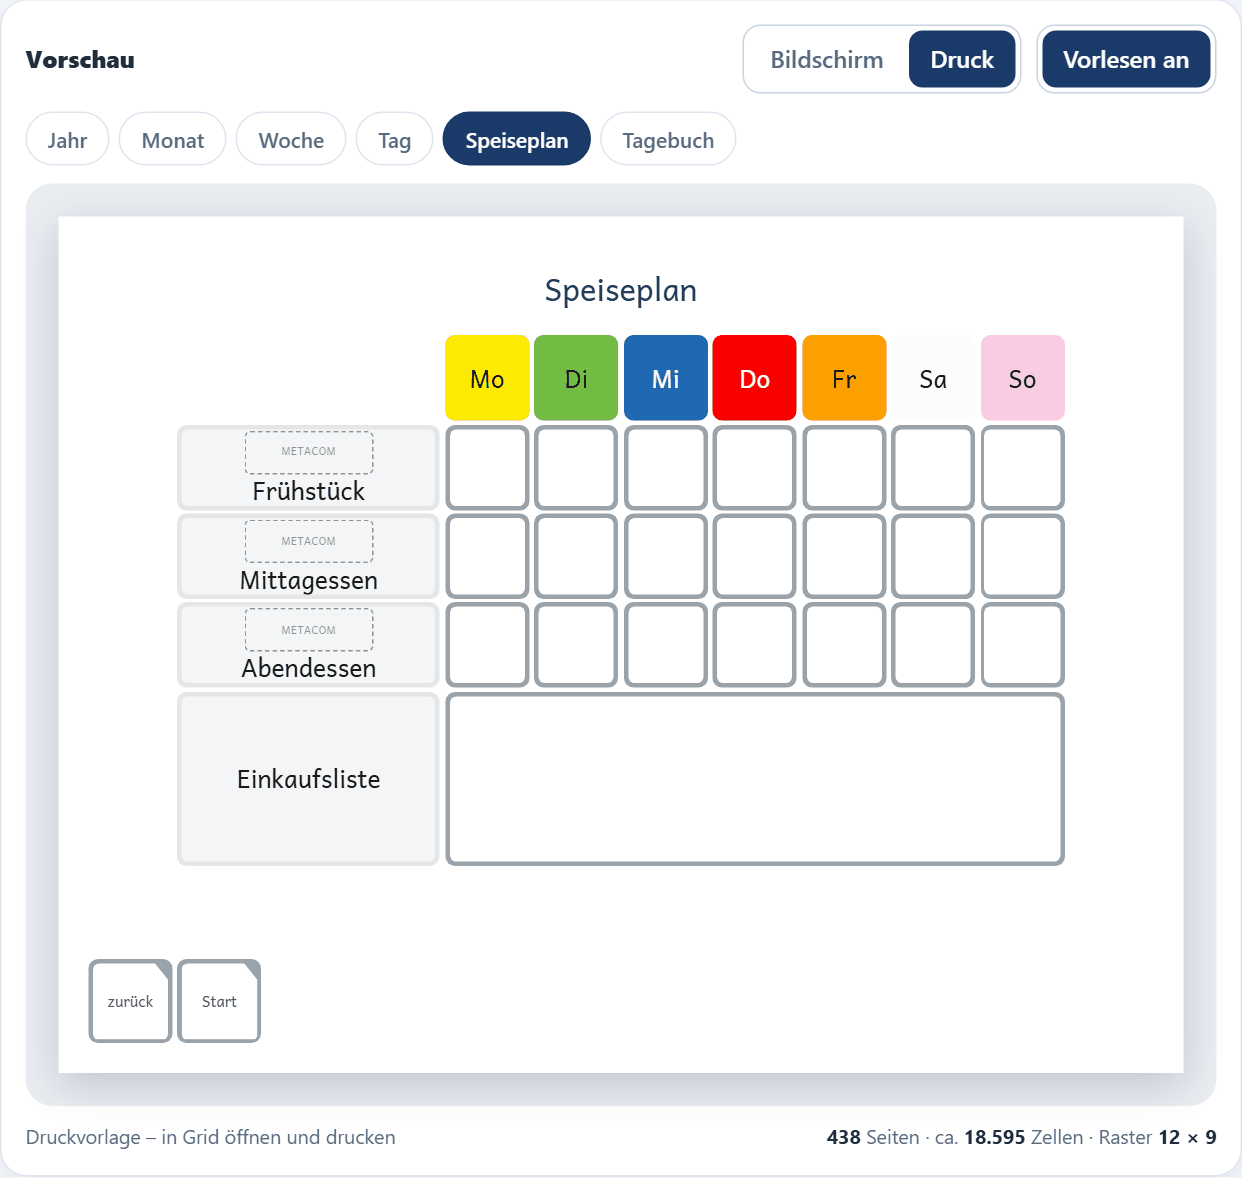
One printed sheet for a week: breakfast, lunch, dinner and a shopping list. Print a fresh one each week.
n more sleeps
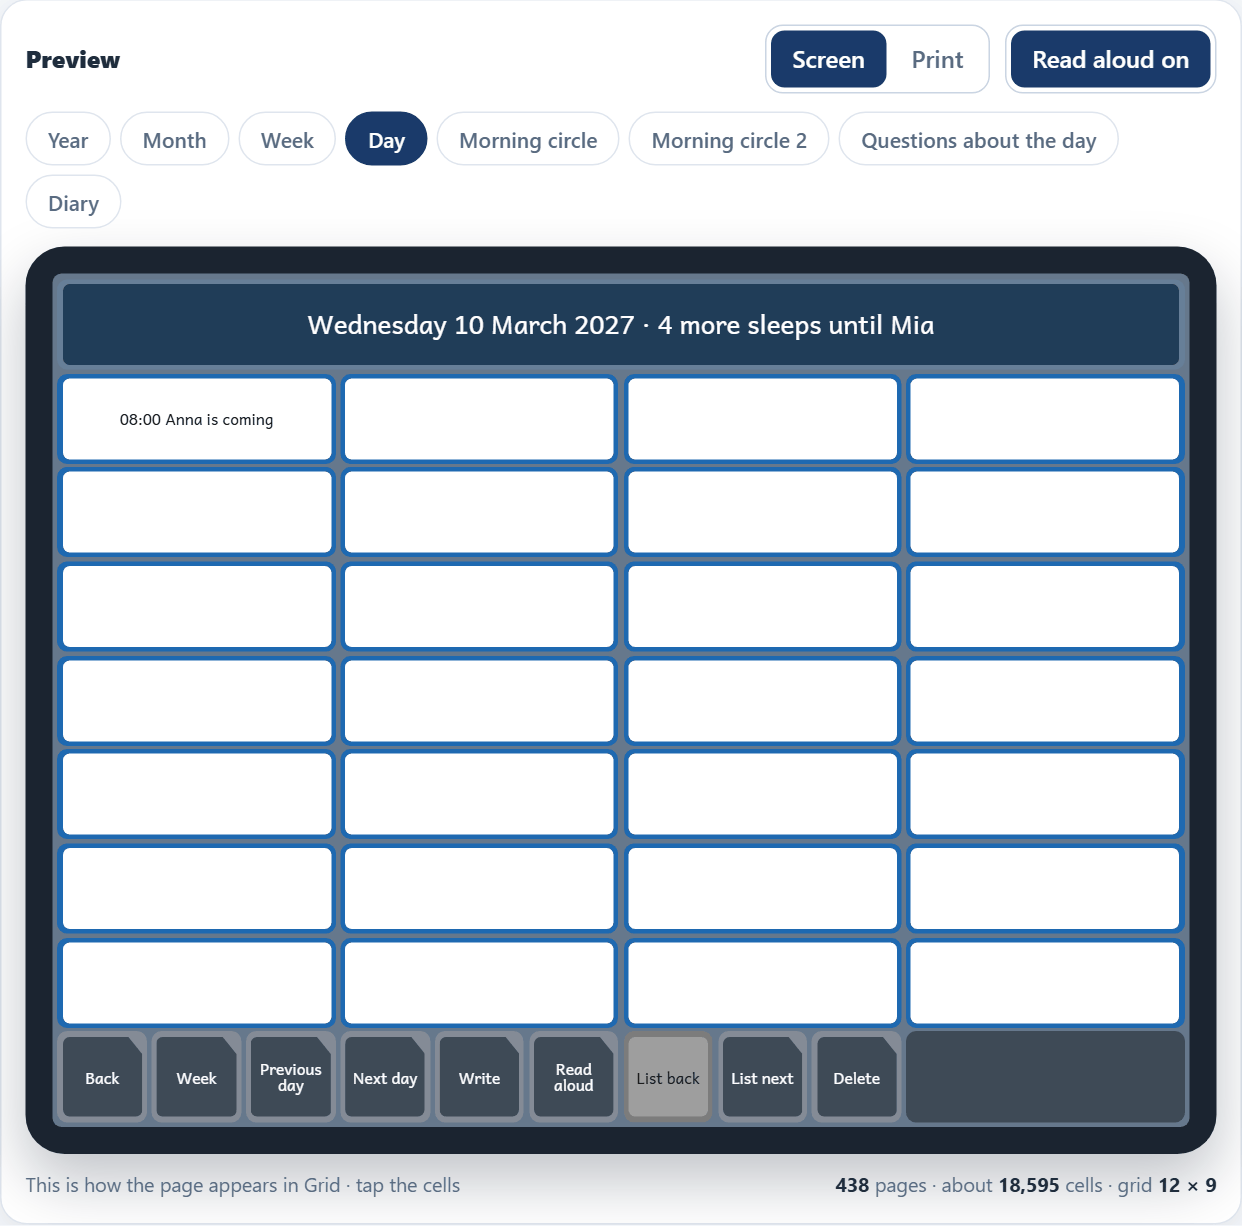
Each day page shows how many more sleeps there are until the next birthday, public holiday or start of the holidays – for example “3 more sleeps until Mia”. It is read aloud with the page. Choose how far ahead it counts: one week, two weeks or one month.
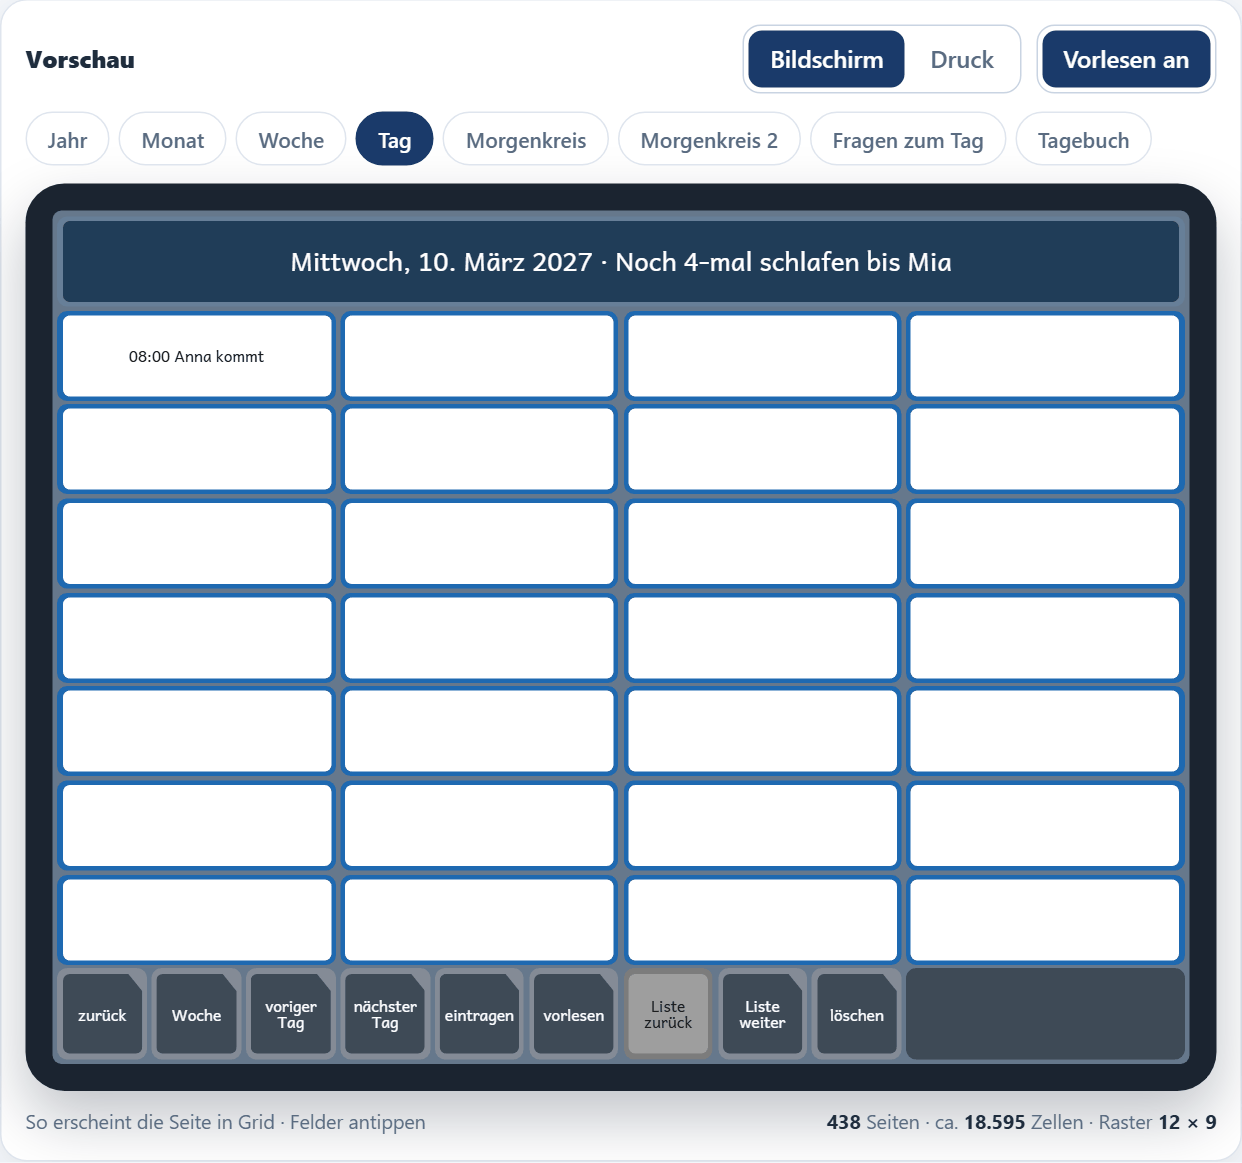
A day page: the title says how many more sleeps; “Anna is coming” is already entered.
Step 4: Appearance and symbols
Choose the weekday colours, a symbol set and, if needed, high contrast. For the wall calendar you can add your own photo for each month – without a photo, the month symbol of the chosen symbol set is used.
METACOM, PCS and SymbolStix: CalendarMaker contains none of these symbols and copies none. The grid set only contains a reference – the name of the symbol. Grid shows and prints it only if the symbol set is installed and licensed on the device. Otherwise the tile shows its text. Grid’s own symbols and “text only” work everywhere.
AssistUK symbols: AssistUK’s own symbols are put into the grid set as pictures. They need no licence and look the same on every device. Choose whether the pictures show a woman or a man, and the colours of skin, hair, clothes and eyes – Grid cannot change the colours of a picture later, so they are set when the grid set is made. Weekdays, months and clocks are signs without writing: a calendar sheet in the colour of the day that marks the day of the week or the month of the year – the same in every language. The pictures were drawn with AI and edited by AssistUK. A grid set with AssistUK symbols is larger, because the pictures are inside it.
Every symbol has been checked against the real library, never guessed. Where a symbol set has no fitting picture, the tile keeps its text – a wrong picture would be worse than none.
Step 5: Words and sentences
Everything that is written on the tiles or read aloud can be changed here – in the language of the grid set: morning circle, feelings, clothes, food, questions, the diary and the meal plan. Your changes are saved with the project.
The number of parts is fixed (six feelings = six tiles); only the text can be changed. Placeholders in curly brackets such as {name} or {n} must stay in the text.
Step 6: Special days and people
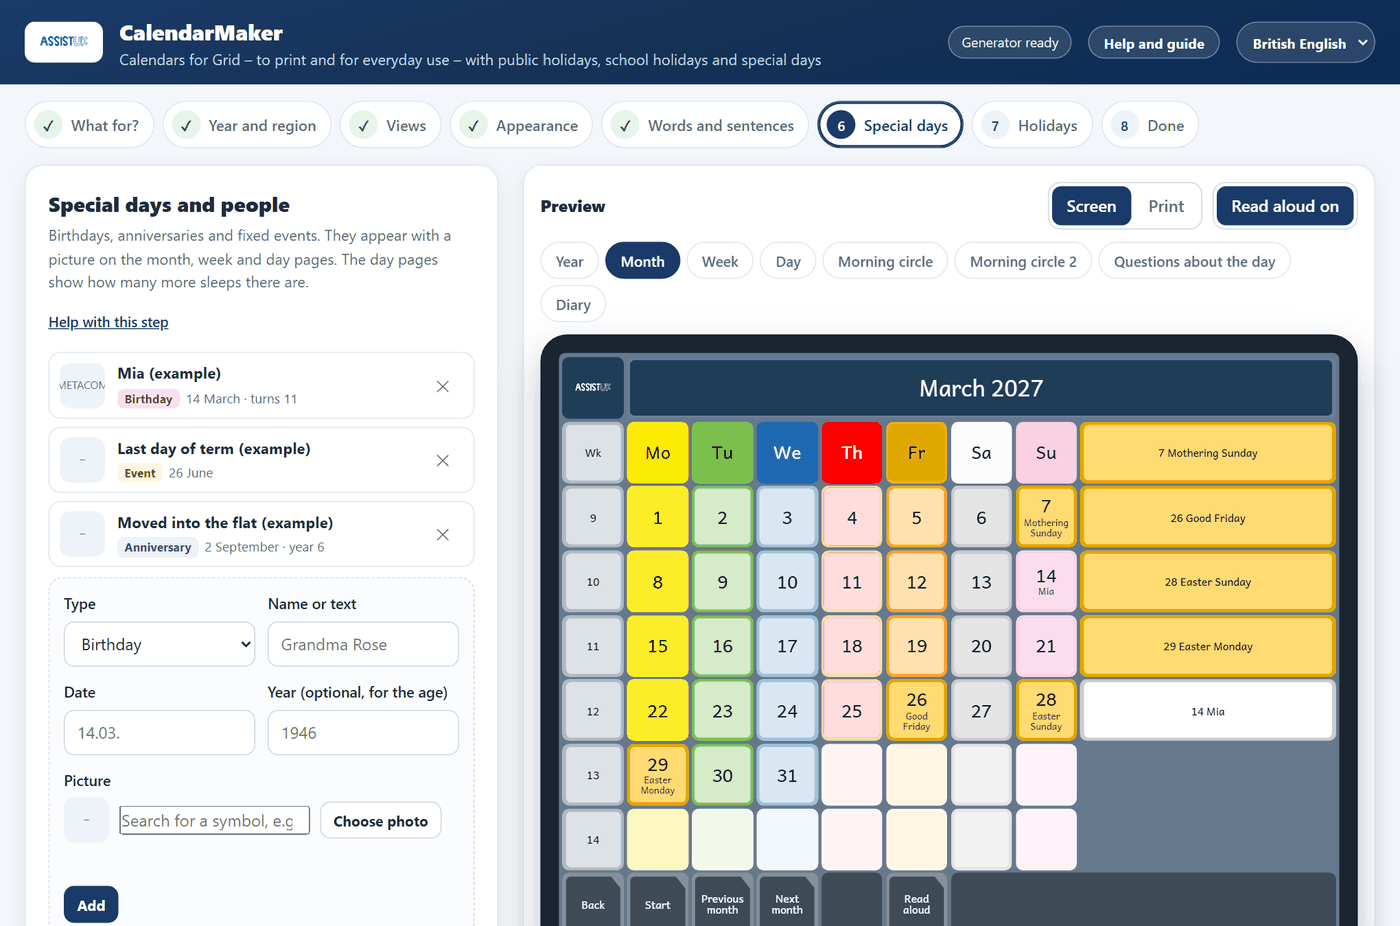
Special days are birthdays, anniversaries and fixed events. They appear with a picture on the month, week and day pages; with a year of birth the age is added (“Mia (11)”). You can import yearly entries from a calendar file (.ics).
Who comes? – people who come regularly: support workers, therapists, family. Enter the name, the weekdays, the time and a photo if you like (up to six people). They appear:
in the morning circle under “Who is coming today?” – with their photo;
on their weekdays already as an entry on the day page and on the printed day sheet (“08:00 Anna is coming”).
Weekly appointments (swimming on Tuesdays at 10:00) are entered on every matching day in the same way.
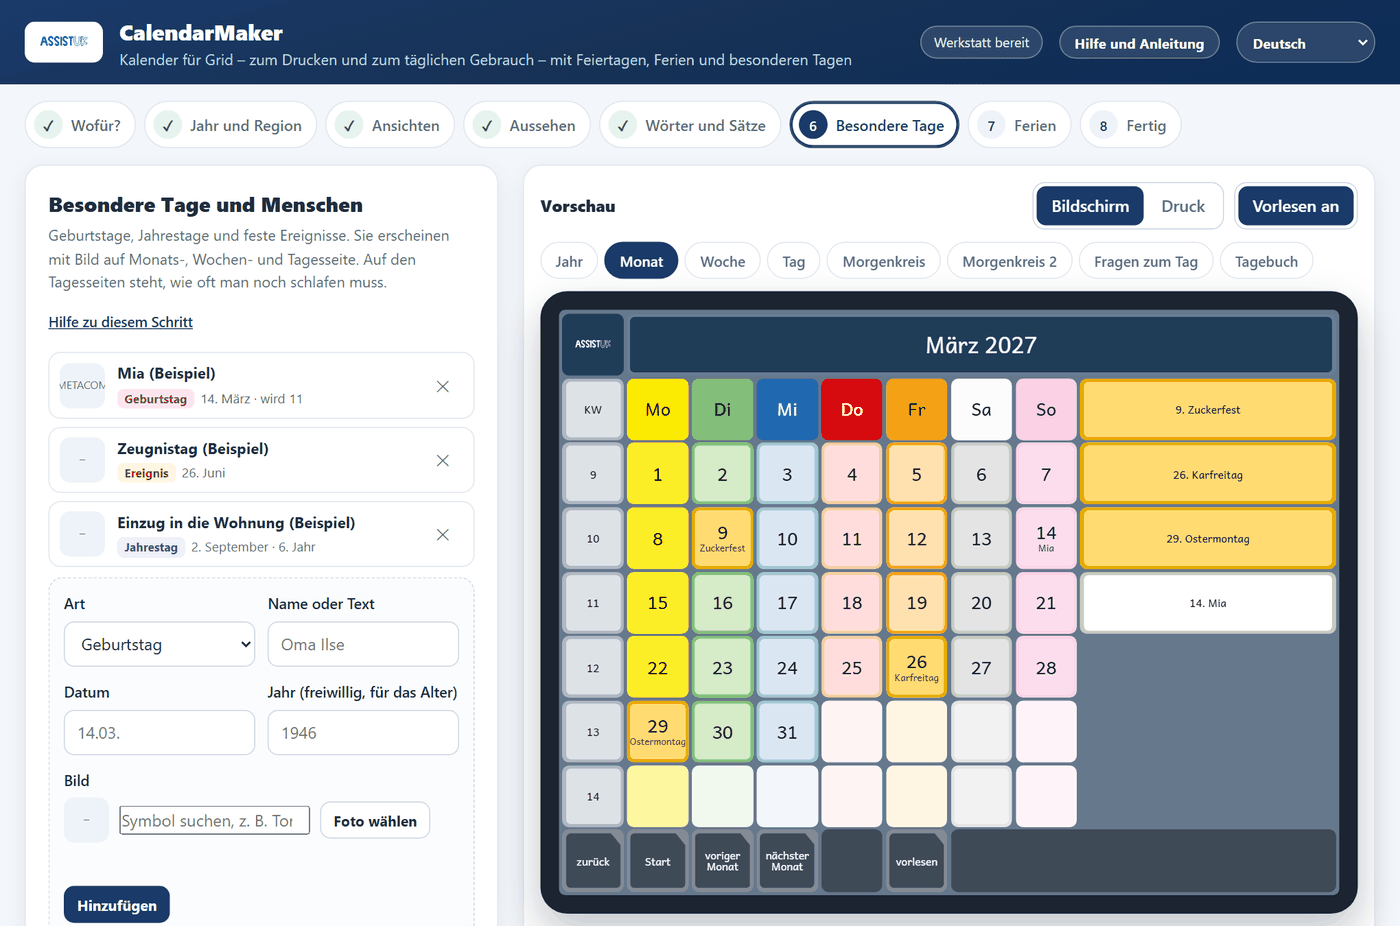
Step 6: special days, people, weekly appointments.
Photos are made smaller in the browser and saved without location data. Nothing is uploaded.
Step 7: Holidays
For many countries CalendarMaker knows the school holidays (source: OpenHolidays). Choose your holiday region. Add your own free days, for example a bridge day or a closed workshop. Holidays appear on their first day, with the end date. Please check the dates with the school before printing.
Step 8: Create and save
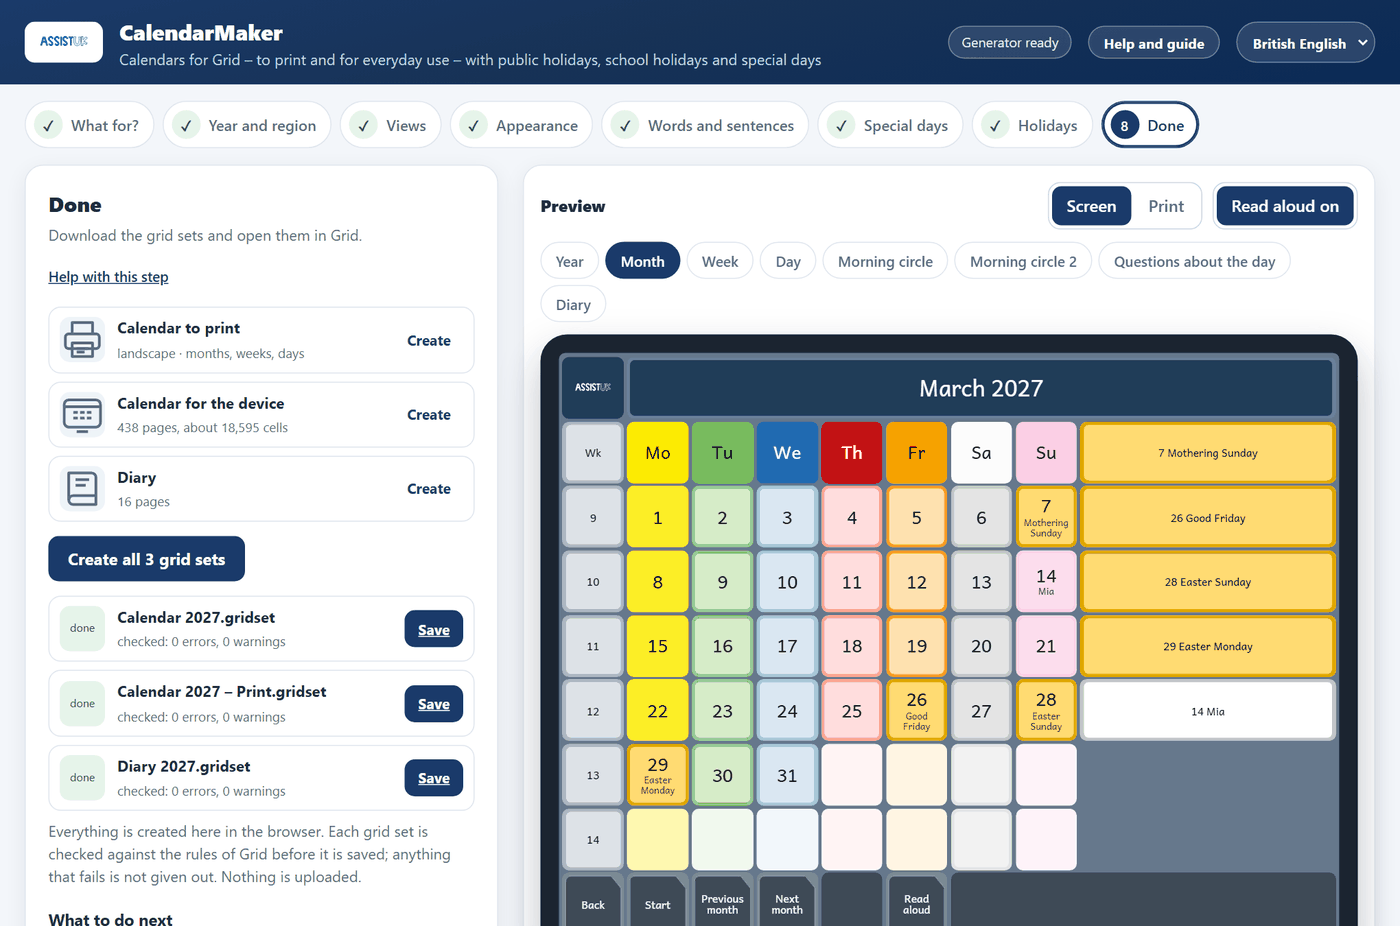
Press Create all … grid sets. Each grid set is built in your browser and checked against the rules of Grid before it is saved; a file that fails the check is not handed out.
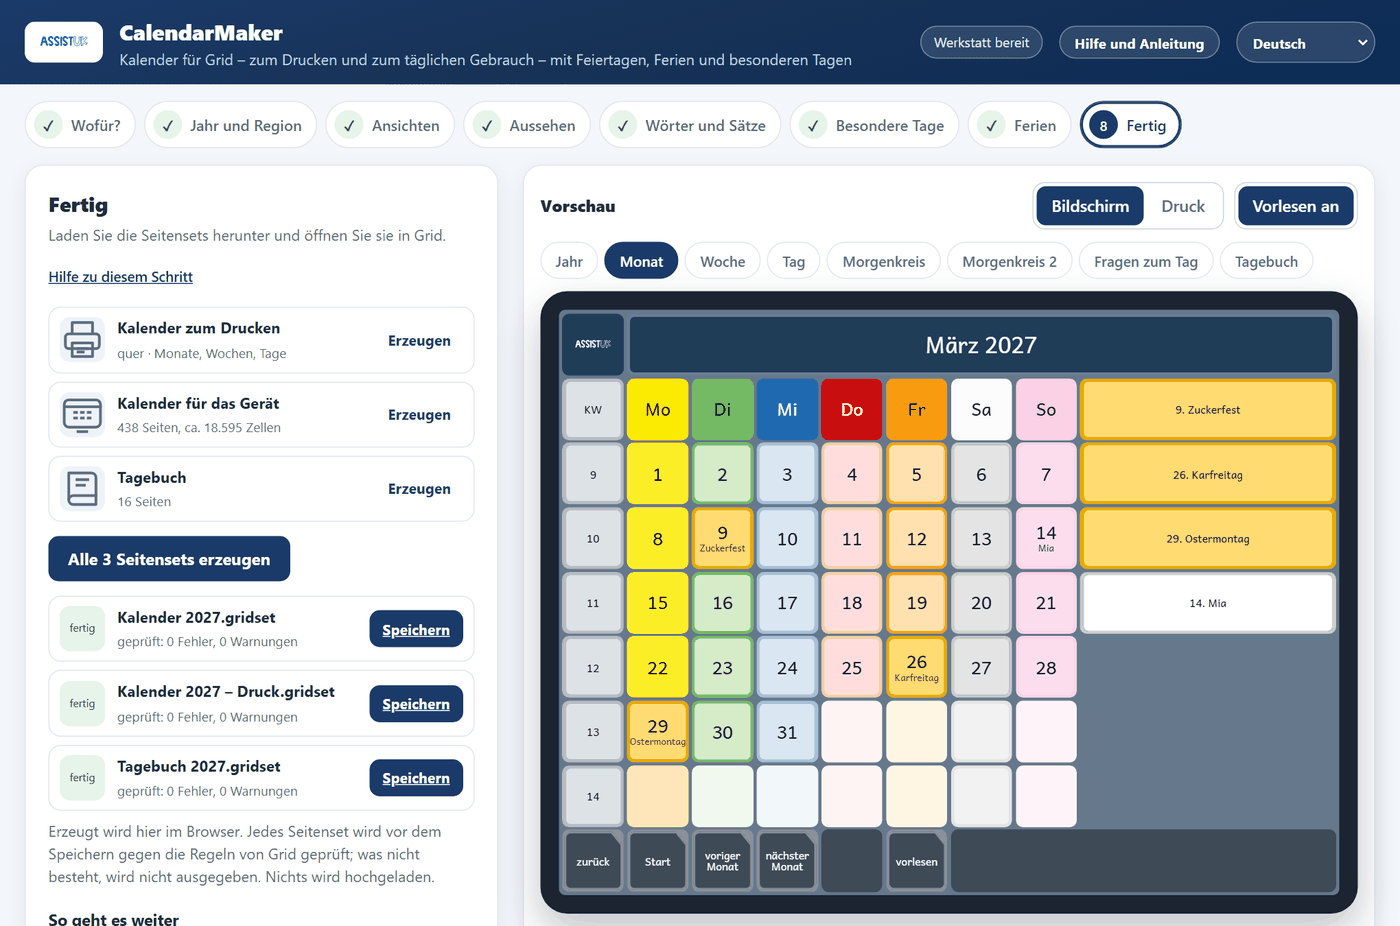
Step 8: three grid sets, each “checked: 0 errors, 0 warnings”.
Save project stores a small file with all your settings, special days and photos. Keep it – with it you can change the calendar later or make next year’s.
Adding it in Grid
Copy the .gridset files to the device with Grid (for example with a USB stick or by e-mail).
In Grid, open Grid Explorer, choose Add grid set and select the file.
The calendar opens on its start page: the year. The fonts come with Grid; there is nothing to install.
The grid sets are made for Grid – Grid 3 and Grid for iPad. So far they have been tested on Windows.
Using it on the device
Year, month, week, day
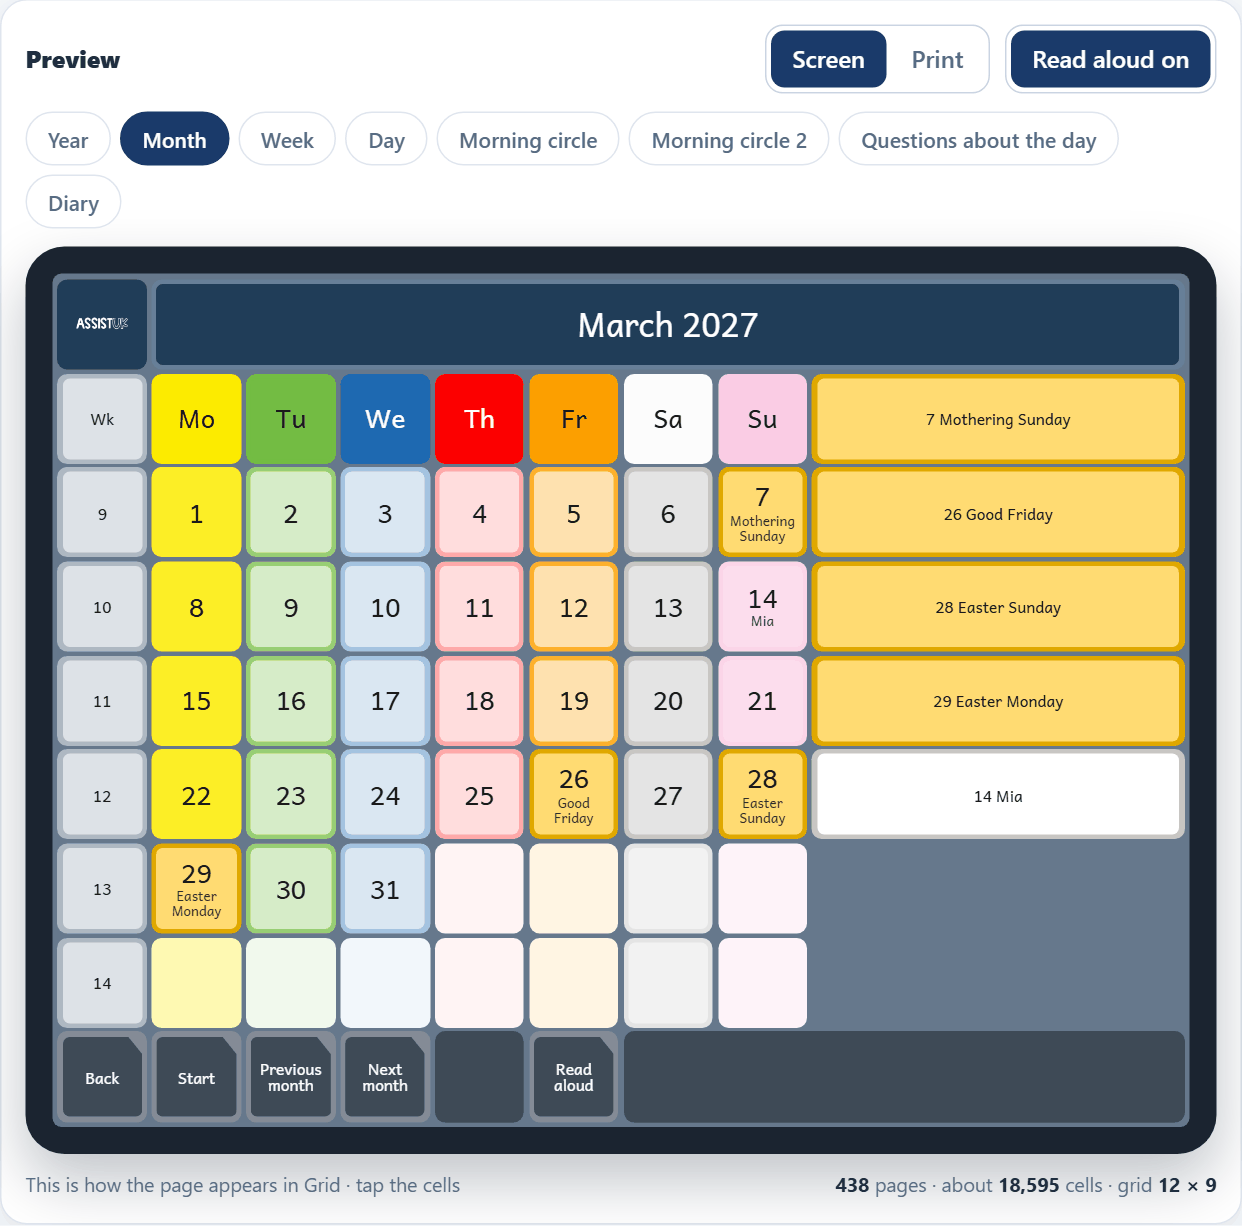
Start page = the year. Tap a month, then a day. The day page has 28 boxes for appointments. Add appointment opens the keyboard; Add to calendar writes the text into the day. Delete appointment removes the selected entry. The entries are stored in the grid set itself.
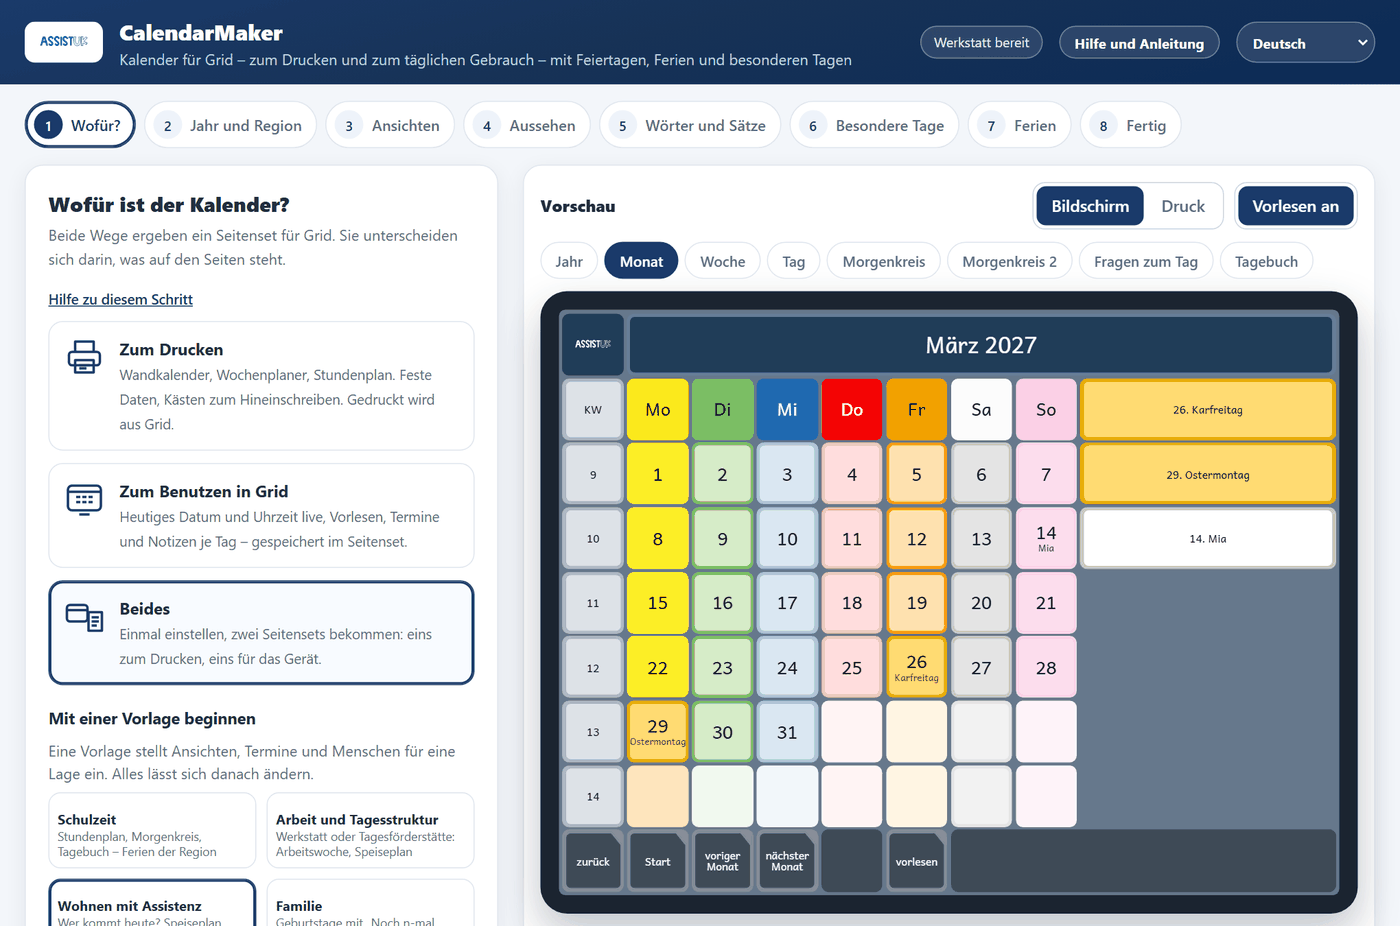
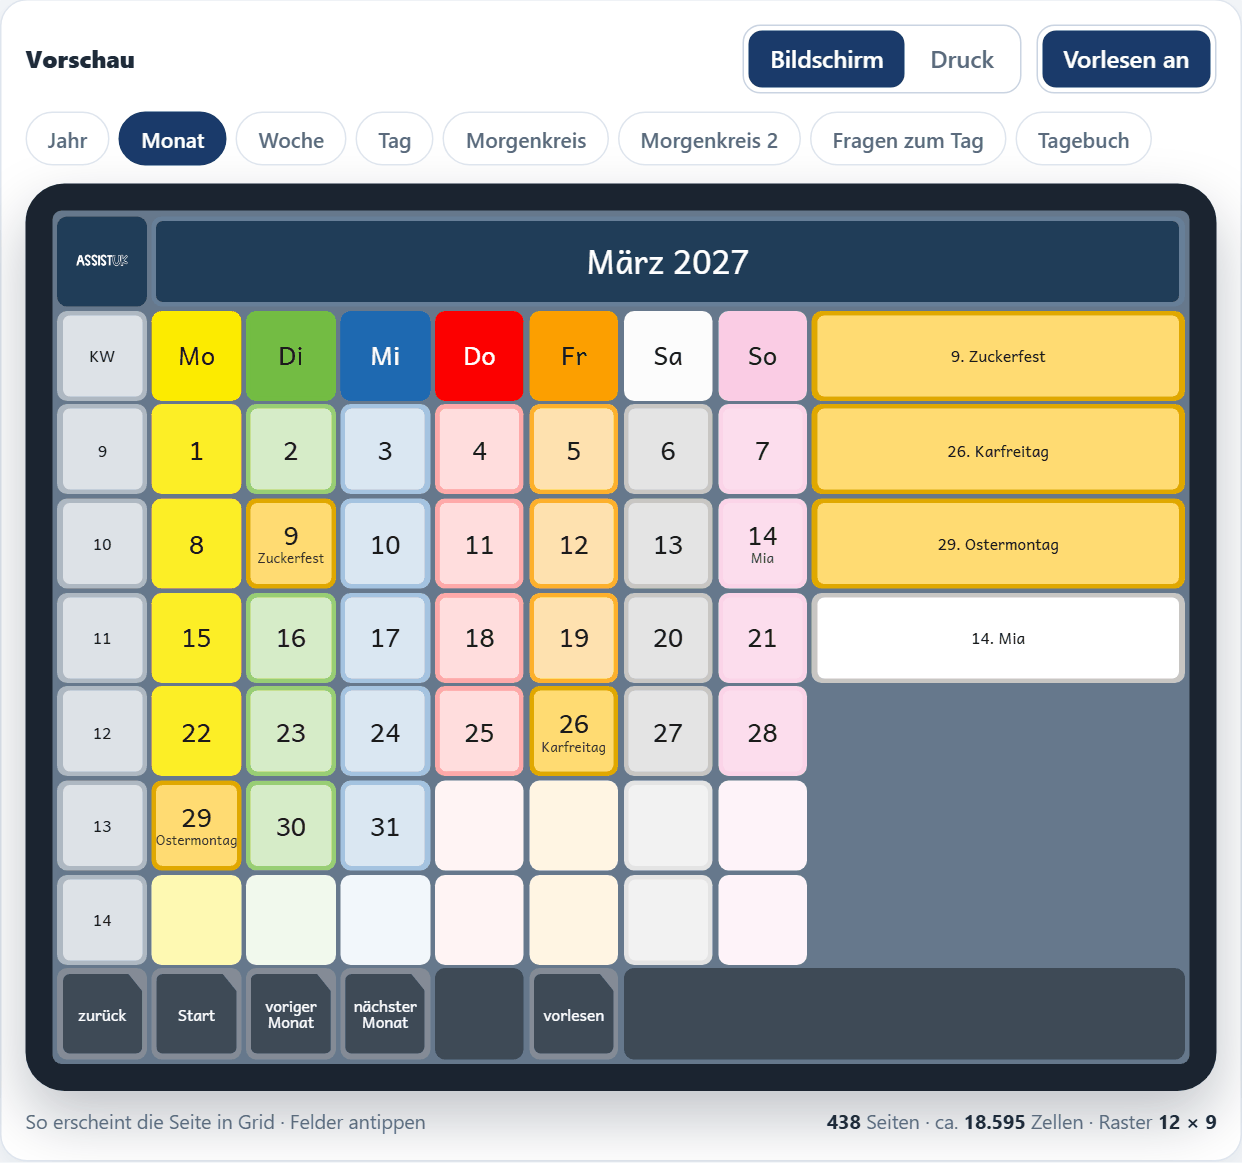
Month page: week numbers on the left, holidays of this month on the right.
Morning circle
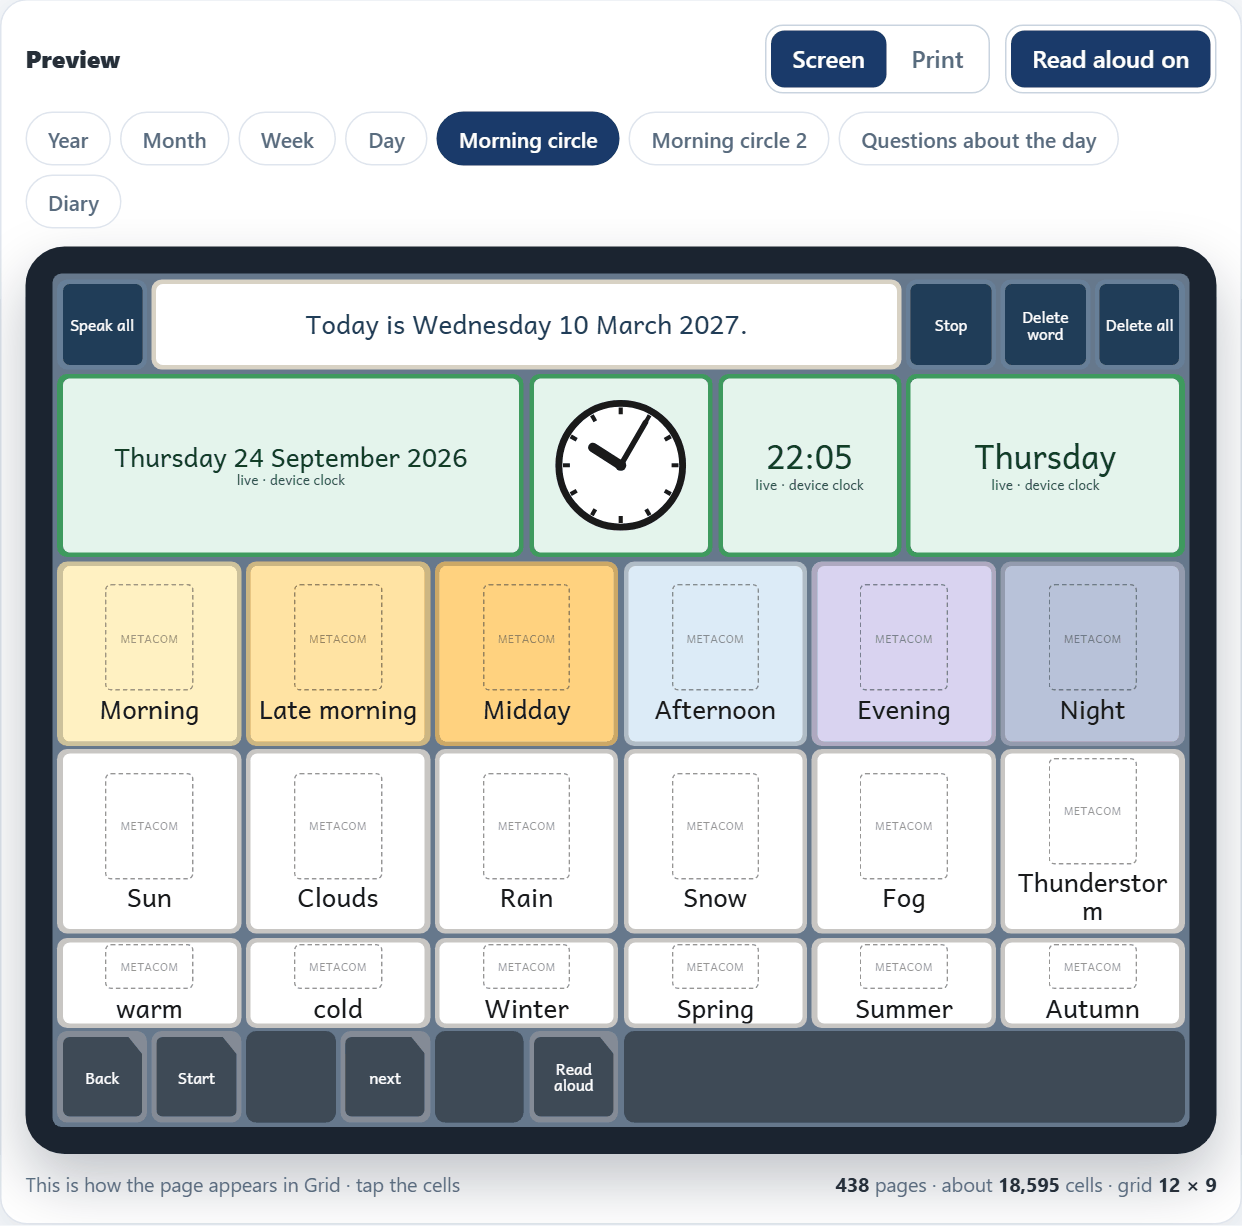
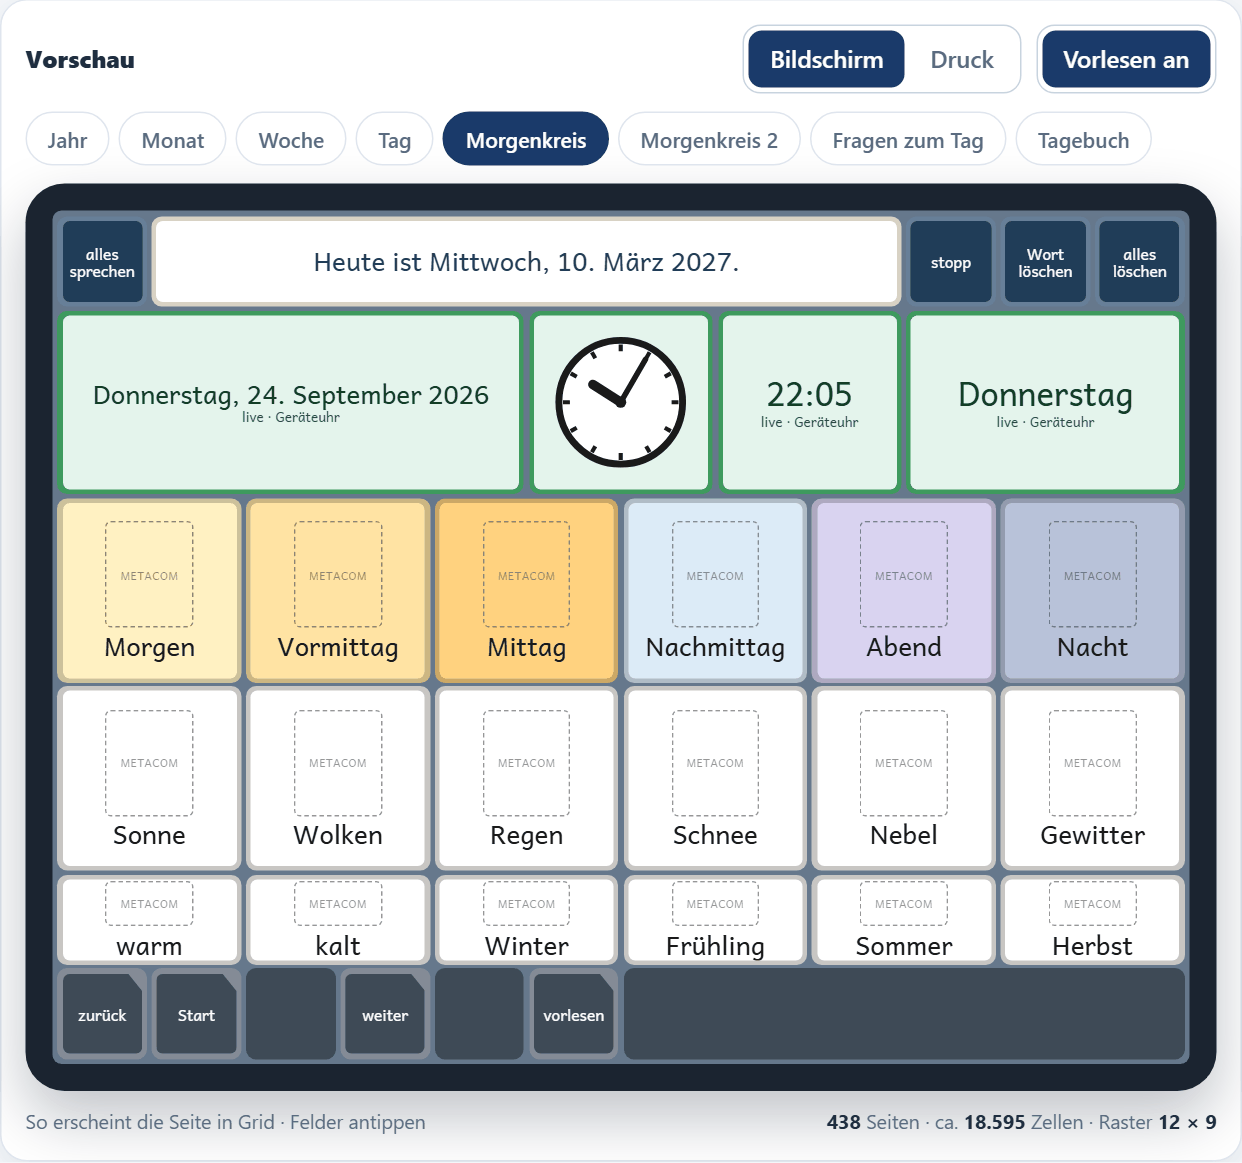
Page 1: date, clock and weekday come live from the device. Time of day, weather, temperature and season are chosen – every tile writes a whole sentence into the message bar, and Speak all reads it aloud.
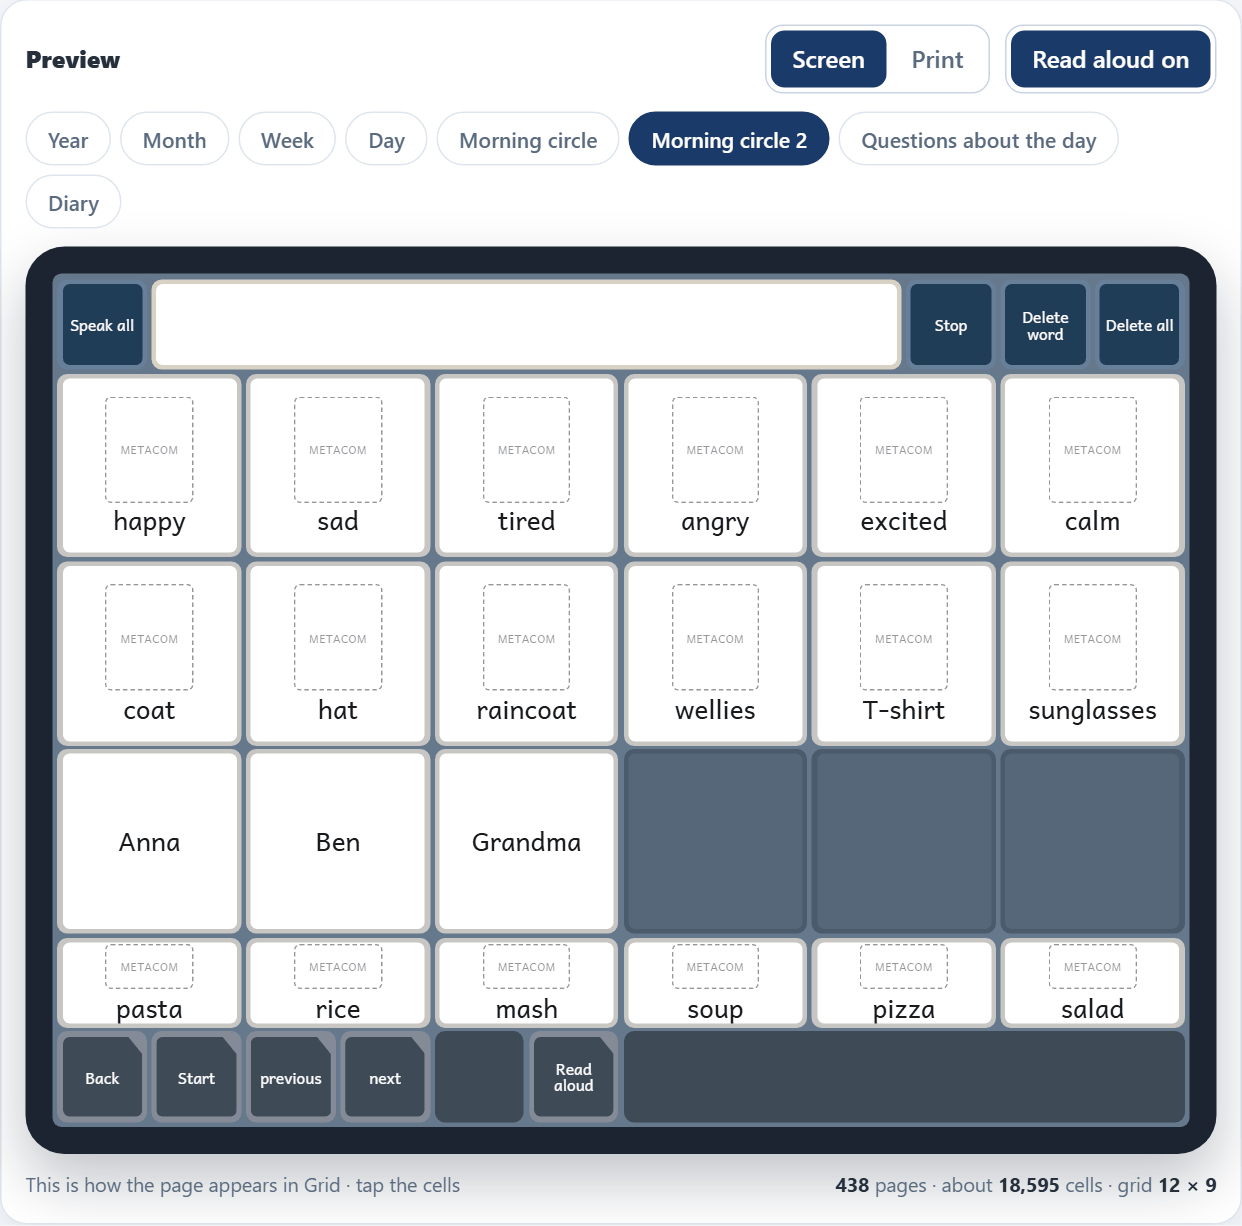
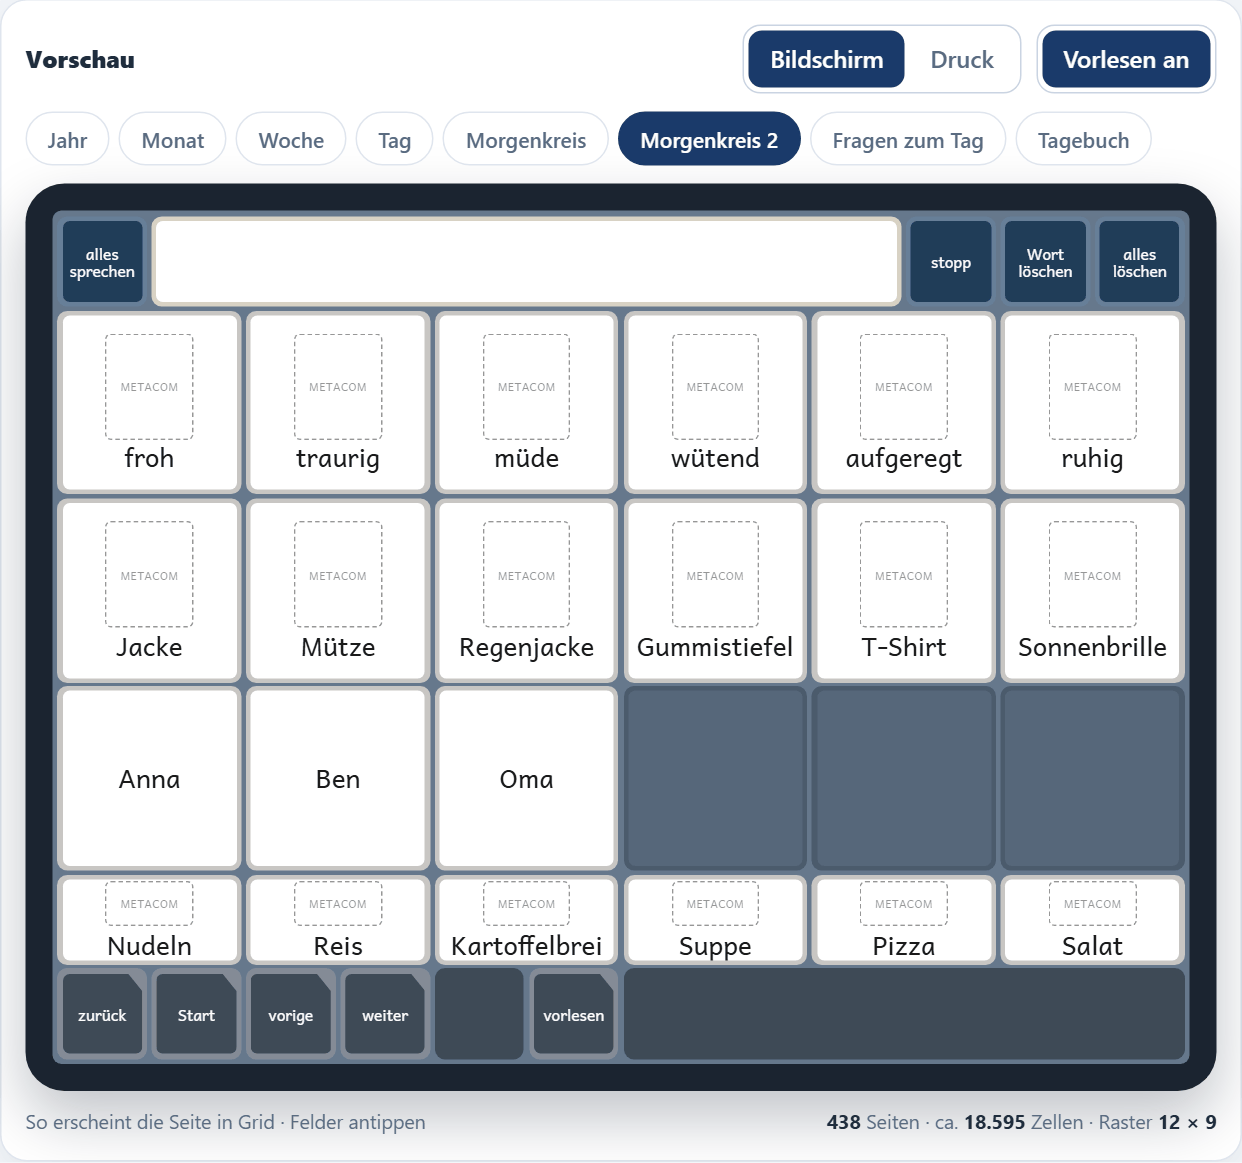
Page 2: How do I feel? What shall I wear? Who is coming today? What is there to eat? The sentence keeps growing across the pages.
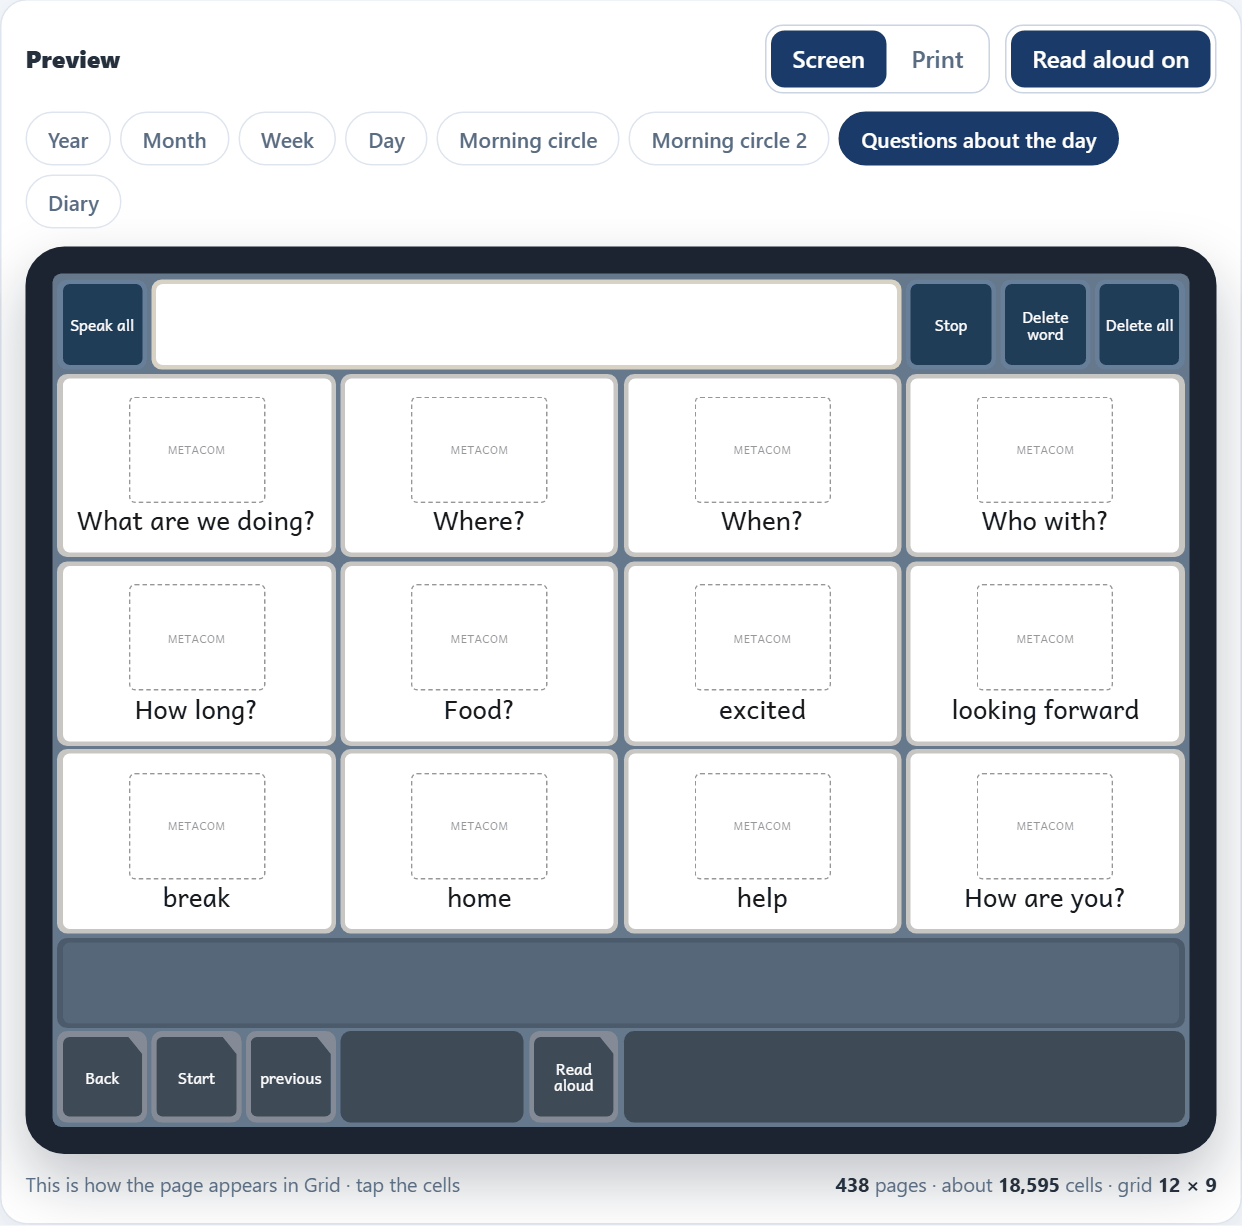
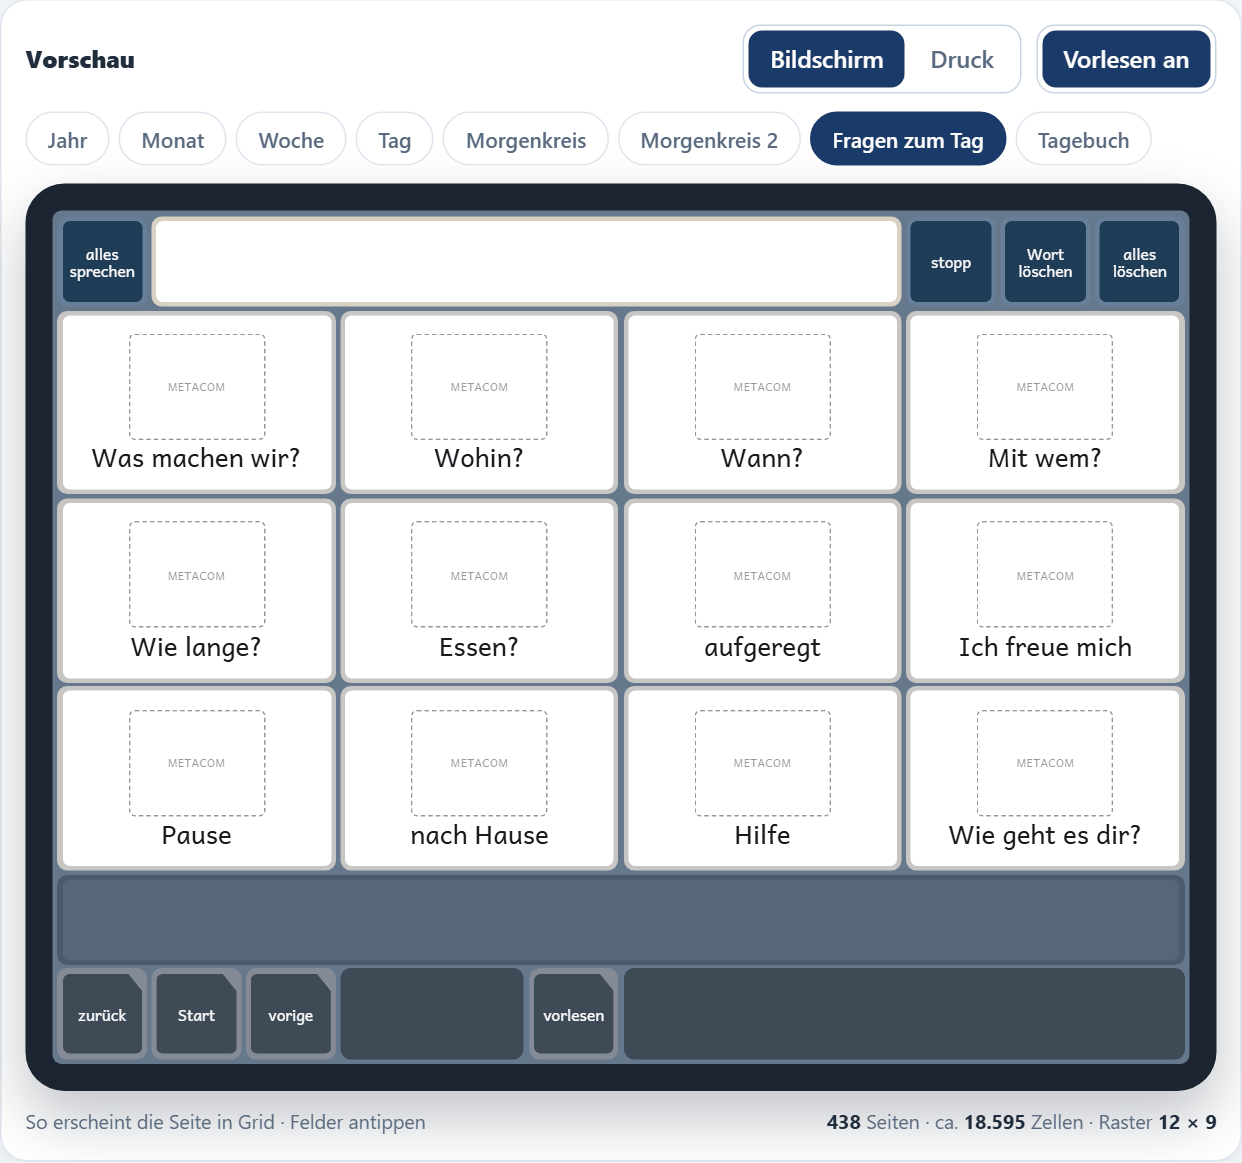
Questions about the day help to get ready for an appointment, a visit to the doctor or an outing: Where are we going? When do we leave? Who am I going with? How long will it take? I need a break.
Printing
Open the printable calendar in Grid, go to the sheet you want and print it with Grid’s print function (Print grids – current grid, selected grids or all grids). The printed sheets only show the calendar; the small grey links in the margin look like page numbers.
The meal plan: seven days, three meals, a shopping list.
The diary
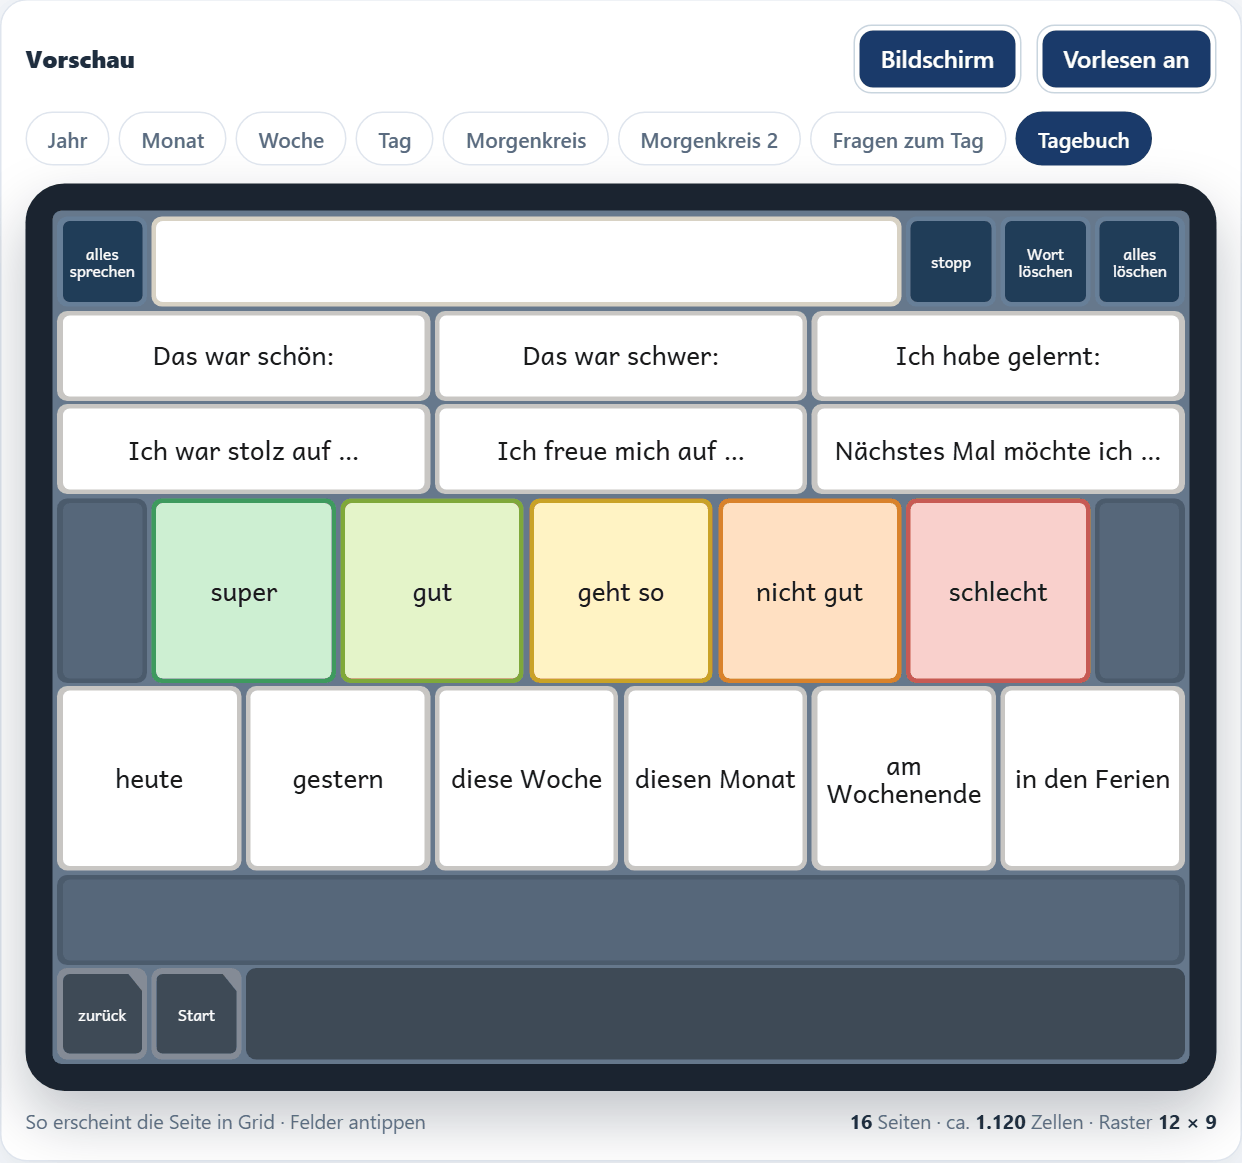
Tap a day, press Write entry, write, then Add to diary. With the writing aids switched on there are sentence starters and feelings and a page for looking back: sentence starters (“This was nice:”), a mood scale from great to bad and time words (“this week”). Go back to the keyboard and put the text into the diary from there.
A number lock can be put in front of the diary. It is a door, not a safe: the numbers are readable in the file. It keeps others away on a shared device, but does not protect against someone who opens the file.
Next year
Load your project file, change the year and check the special days.
For the diary, choose the old diary file under “Also” – its entries come along.
Create the grid sets again and add them in Grid.
Questions and problems
The tiles show text but no symbols.
The chosen symbol set is not installed or not licensed in Grid – or it has no picture for this tile. Check the symbol set in step 4.
The people in the pictures don’t look right.
With AssistUK symbols, choose woman or man and the colours in step 4, then make the grid set again. Grid cannot change the colours of a picture afterwards.
Grid takes a moment when the calendar is added.
The calendar for the device has a page for every day of the year. Grid analyses it once when it is added.
Does anything go over the internet?
Only loading: the page, the generator and the holiday tables come from the CalendarMaker server. Building the grid sets happens in your browser – your entries, names and photos are not sent anywhere.
Which languages?
At the moment CalendarMaker and its new content are available in English and German. More languages will follow.
Who can help?
AssistUK helps free of charge: assistuk.net/hilfe. For devices and Grid itself, please contact the supplier of the device first.
Hilfe und Anleitung
CalendarMaker macht Kalender für Grid – zum Ausdrucken und zum täglichen Gebrauch auf der Kommunikationshilfe. Er ist kostenlos, läuft im Browser und braucht keine Anmeldung. Alles, was Sie eingeben, bleibt in Ihrem Browser.
Aus einer Einstellung macht CalendarMaker bis zu drei Seitensets:
Kalender für das Gerät – Jahr, Monate, Wochen und eine Seite für jeden Tag. Datum und Uhrzeit kommen live aus dem Gerät. Termine werden in die Tagesseite geschrieben und bleiben im Seitenset. Mit Morgenkreis, Fragen zum Tag und „Noch n-mal schlafen“.
Kalender zum Drucken – Wandkalender, Wochenplaner, Tagesblätter, Stundenplan und Speiseplan. Gedruckt wird aus Grid.
Tagebuch – Tag antippen, schreiben, „Ins Tagebuch“. Mit Satzanfängen, Gefühlen und einer Seite für den Rückblick. Die Einträge lassen sich ins nächste Jahr mitnehmen.
Alle Seiten stehen auf demselben Raster 12 × 9, wie alle AssistUK-Seitensets. Zurück, Start und Meine Seiten stehen immer unten links.
In zehn Minuten zum Kalender
CalendarMaker öffnen. Auf der ersten Seite eine passende Vorlage wählen – Schule, Arbeit, Wohnen mit Assistenz oder Familie.
Jahr, Land und Region wählen. Sie bestimmen Feiertage und Schulferien.
Geburtstage und die Menschen, die regelmäßig kommen, eintragen – gern mit Foto.
Im letzten Schritt Alle … Seitensets erzeugen drücken. Der Browser speichert die Dateien.
In Grid die Dateien unter Meine Seiten → Seitenset hinzufügen hinzufügen.
Projekt speichern drücken. Beim nächsten Mal die Projektdatei laden und weitermachen.
Rechts steht eine Vorschau: Die Kacheln lassen sich antippen – sie lesen vor und schreiben wie in Grid. METACOM-, PCS- und SymbolStix-Symbole erscheinen erst in Grid; die AssistUK-Symbole zeigt die Vorschau schon (siehe Symbole).
Schritt 1: Wofür? Vorlagen
Wählen Sie, ob der Kalender zum Drucken, zum Benutzen in Grid oder für beides ist. „Beides“ ergibt zwei Seitensets aus derselben Einstellung.
Schritt 1: Zweck, Vorlagen und das Tagebuch.
Vorlagen sind ein schneller Anfang. Sie stellen Ansichten, wiederkehrende Termine und Menschen für eine Lage ein:
Schulzeit
Stundenplan, Morgenkreis, Tagebuch, Ferien der Region.
Arbeit und Tagesstruktur
Für Werkstatt oder Tagesförderstätte: Arbeitswoche, Speiseplan, Fahrdienst.
Wohnen mit Assistenz
„Wer kommt heute?“, Speiseplan, Einkaufen, Tagesablauf.
Familie
Geburtstage mit „Noch n-mal schlafen“, Tagebuch, Wandkalender.
Einträge mit „(Beispiel)“ sind zum Ersetzen da. Alles lässt sich danach ändern. Unter den Vorlagen lässt sich das Tagebuch als eigenes Seitenset dazunehmen.
Schritt 2: Jahr und Region
Land und Region bestimmen die Feiertage; die Sprache bestimmt Monats- und Tagesnamen und alle Aufschriften im Seitenset. Für viele Länder lässt sich eine Region wählen – dann stehen nur die Feiertage im Kalender, die dort gelten.
Die Sprache des Seitensets kann eine andere sein als die der App: zum Beispiel die App auf Englisch und das Seitenset auf Deutsch.
Die Woche kann am Montag, Sonntag oder Samstag beginnen. Kalenderwochen nach ISO gibt es nur, wenn sie am Montag beginnt.
Schritt 3: Ansichten
Schalten Sie ein, was der Kalender enthalten soll: Jahr, Monat, Woche, Tag, Morgenkreis. Für die Druckblätter wählen Sie außerdem das Layout und quer oder hochkant.
Schritt 3: Ansichten und Layouts.
Stundenplan
Ein Druckblatt für das ganze Schuljahr: Montag bis Freitag, acht Stunden.
Speiseplan
Ein Druckblatt für eine Woche: Frühstück, Mittagessen, Abendessen und eine Einkaufsliste. Jede Woche neu ausdrucken.
Noch n-mal schlafen
Auf jeder Tagesseite steht, wie oft man noch schlafen muss bis zum nächsten Geburtstag, Feiertag oder Ferienbeginn – zum Beispiel „Noch 4-mal schlafen bis Mia“. Es wird mit der Seite vorgelesen. Wählbar ist, wie weit es vorausschaut: eine Woche, zwei Wochen oder einen Monat.
Eine Tagesseite: Der Titel sagt, wie oft man noch schlafen muss; „Anna kommt“ steht schon drin.
Schritt 4: Aussehen und Symbole
Wählen Sie die Wochentagsfarben, eine Symbolsammlung und bei Bedarf hohen Kontrast. Für den Wandkalender lässt sich für jeden Monat ein eigenes Foto einsetzen – ohne Foto steht dort das Monatssymbol der gewählten Sammlung.
METACOM, PCS und SymbolStix: Diese Symbole enthält und kopiert CalendarMaker nicht. Ins Seitenset kommt nur ein Verweis – der Name des Symbols. Grid zeigt und druckt es nur, wenn die Symbolsammlung auf dem Gerät installiert und lizenziert ist. Sonst steht auf der Kachel der Text. Grids eigene Symbole und „nur Text“ gehen überall.
AssistUK-Symbole: Die eigenen Symbole von AssistUK kommen als Bild ins Seitenset. Sie brauchen keine Lizenz und sehen auf jedem Gerät gleich aus. Wählen Sie, ob auf den Bildern eine Frau oder ein Mann zu sehen ist, und die Farben von Haut, Haaren, Kleidung und Augen – Grid kann die Farben eines Bildes nicht nachträglich ändern, deshalb werden sie beim Erzeugen festgelegt. Wochentage, Monate und Uhren sind Zeichen ohne Schrift: ein Kalenderblatt in der Farbe des Tages, das den Tag in der Woche bzw. den Monat im Jahr markiert – in jeder Sprache gleich. Die Bilder sind mit KI gezeichnet und von AssistUK bearbeitet. Ein Seitenset mit AssistUK-Symbolen ist größer, weil die Bilder darin stecken.
Jedes Symbol ist gegen die echte Sammlung geprüft, keines geraten. Wo eine Sammlung kein passendes Bild hat, behält die Kachel ihren Text – ein falsches Bild wäre schlechter als keines.
Schritt 5: Wörter und Sätze
Alles, was auf den Kacheln steht oder vorgelesen wird, lässt sich hier ändern – in der Sprache des Seitensets: Morgenkreis, Gefühle, Kleidung, Essen, Fragen, Tagebuch und Speiseplan. Die Änderungen werden mit dem Projekt gespeichert.
Die Zahl der Teile ist fest (sechs Gefühle = sechs Kacheln); nur der Text ist frei. Platzhalter in geschweiften Klammern wie {name} oder {n} müssen im Text bleiben.
Schritt 6: Besondere Tage und Menschen
Besondere Tage sind Geburtstage, Jahrestage und feste Ereignisse. Sie erscheinen mit Bild auf Monats-, Wochen- und Tagesseite; mit Geburtsjahr steht das Alter dabei („Mia (11)“). Jährliche Einträge lassen sich aus einer Kalenderdatei (.ics) einlesen.
Wer kommt? – Menschen, die regelmäßig kommen: Assistenz, Therapie, Familie. Name, Wochentage, Uhrzeit und auf Wunsch ein Foto eintragen (bis zu sechs Menschen). Sie erscheinen:
im Morgenkreis unter „Wer kommt heute?“ – mit Foto;
an ihren Wochentagen schon als Eintrag auf der Tagesseite und auf dem Tagesblatt zum Drucken („08:00 Anna kommt“).
Wiederkehrende Termine (dienstags 10:00 Schwimmen) stehen genauso an jedem passenden Tag.
Fotos werden im Browser verkleinert und ohne Aufnahmeort gespeichert. Nichts wird hochgeladen.
Schritt 7: Ferien
Für viele Länder kennt CalendarMaker die Schulferien (Quelle: OpenHolidays). Wählen Sie Ihre Ferienregion. Eigene freie Tage lassen sich dazu eintragen, zum Beispiel ein Brückentag oder Betriebsferien der Werkstatt. Ferien stehen an ihrem ersten Tag, mit Ende. Bitte die Daten vor dem Drucken mit der Schule abgleichen.
Schritt 8: Erzeugen und speichern
Drücken Sie Alle … Seitensets erzeugen. Jedes Seitenset wird in Ihrem Browser gebaut und vor dem Speichern gegen die Regeln von Grid geprüft; was die Prüfung nicht besteht, wird nicht ausgegeben.
Schritt 8: drei Seitensets, jedes „geprüft: 0 Fehler, 0 Warnungen“.
Projekt speichern legt eine kleine Datei mit allen Einstellungen, besonderen Tagen und Fotos ab. Heben Sie sie auf – damit lässt sich der Kalender später ändern oder der fürs nächste Jahr machen.
In Grid hinzufügen
Die .gridset-Dateien auf das Gerät mit Grid bringen (zum Beispiel mit einem USB-Stick oder per E-Mail).
In Grid Meine Seiten öffnen, Seitenset hinzufügen wählen und die Datei auswählen.
Der Kalender öffnet auf seiner Startseite: dem Jahr. Die Schrift bringt Grid selbst mit; es ist nichts zu installieren.
Die Seitensets sind für Grid gebaut – Grid 3 und Grid for iPad. Geprüft sind sie bisher unter Windows.
Auf dem Gerät benutzen
Jahr, Monat, Woche, Tag
Startseite = das Jahr. Einen Monat antippen, dann einen Tag. Die Tagesseite hat 28 Felder für Termine. Termin eintragen öffnet die Tastatur; In den Kalender schreibt den Text in den Tag. Termin löschen entfernt den gewählten Eintrag. Die Einträge stehen im Seitenset selbst.
Monatsseite: links die Kalenderwoche, rechts die Feiertage dieses Monats.
Morgenkreis
Seite 1: Datum, Uhr und Wochentag kommen live aus dem Gerät. Tageszeit, Wetter, Temperatur und Jahreszeit wählt man – jede Kachel schreibt einen ganzen Satz in die Mitteilungsleiste, Alles sprechen liest ihn vor.
Seite 2: Wie geht es mir? Was ziehe ich an? Wer kommt heute? Was gibt es zu essen? Der Satz wächst über die Seiten weiter.
Fragen zum Tag helfen, einen Termin, einen Arztbesuch oder einen Ausflug vorzubereiten: Wohin gehen wir? Wann geht es los? Mit wem gehe ich? Wie lange dauert es? Ich brauche eine Pause.
Drucken
Den Kalender zum Drucken in Grid öffnen, das gewünschte Blatt aufrufen und über die Druckfunktion von Grid drucken (Seite drucken – aktuelle Seite, ausgewählte Seiten oder alle Seiten). Auf den Druckblättern steht nur der Kalender; die kleinen grauen Wege im Rand sehen aus wie Seitenzahlen.
Der Speiseplan: sieben Tage, drei Mahlzeiten, eine Einkaufsliste.
Das Tagebuch
Einen Tag antippen, Eintrag schreiben, schreiben, dann Ins Tagebuch. Mit eingeschalteter Schreibhilfe gibt es Satzanfänge und Gefühle und eine Seite Rückblick: Satzanfänge („Das war schön:“), eine Stimmungsskala von super bis schlecht und Zeitwörter („diese Woche“). Zurück zur Tastatur gehen und den Text von dort ins Tagebuch schreiben.
Vor das Tagebuch lässt sich ein Zahlenschloss setzen. Es ist eine Tür, kein Tresor: Die Zahlen stehen lesbar in der Datei. Es hält Mitlesende auf einem geteilten Gerät fern, schützt aber nicht vor jemandem, der die Datei öffnet.
Im nächsten Jahr
Die Projektdatei laden, das Jahr ändern und die besonderen Tage prüfen.
Für das Tagebuch unter „Zusätzlich“ die alte Tagebuch-Datei wählen – die Einträge kommen mit.
Die Seitensets neu erzeugen und in Grid hinzufügen.
Fragen und Probleme
Auf den Kacheln steht Text, aber kein Symbol.
Die gewählte Symbolsammlung ist in Grid nicht installiert oder nicht lizenziert – oder sie hat für diese Kachel kein Bild. Die Sammlung in Schritt 4 prüfen.
Die Personen auf den Bildern passen nicht.
Bei den AssistUK-Symbolen in Schritt 4 Frau oder Mann und die Farben wählen, dann das Seitenset neu erzeugen. Grid kann die Farben eines Bildes nicht nachträglich ändern.
Grid braucht beim Hinzufügen einen Moment.
Der Kalender für das Gerät hat eine Seite für jeden Tag des Jahres. Grid prüft ihn beim Hinzufügen einmal.
Geht etwas über das Internet?
Nur das Laden: Seite, Werkstatt und Ferientabellen kommen vom CalendarMaker-Server. Gebaut wird im Browser – Ihre Einträge, Namen und Fotos werden nirgendwohin geschickt.
Welche Sprachen?
CalendarMaker und seine neuen Inhalte gibt es zurzeit auf Deutsch und Englisch. Weitere Sprachen folgen.
Wer hilft?
AssistUK hilft kostenlos: assistuk.net/hilfe. Bei Fragen zum Gerät und zu Grid selbst bitte zuerst an den Versorger des Geräts wenden.